Renalware User Guide --Renal Modules
(Return to the main User Guide TOC)
Renal Modules
Renal Profile Screen
Specific data related to Renal patients is recorded through the Renal Profile (left gutter). Each bit of information usually only needs to be entered once although usually this is done over time. Therefore the cause of the renal disease (the primary renal diagnosis (PRD)) may be entered early as can the Date First Seen (this is the date the patient is first reviewed by the/a renal team). Other information such as the date of ESRF and the first RRT modality usually can only be entered later.
The data in the Renal Profile is important for the data returns to the UK Renal Registry and is important for local audits. In the main it is considered best for the PRD to be entered by the consultants for greater accuracy.
Haemodialysis (HD)
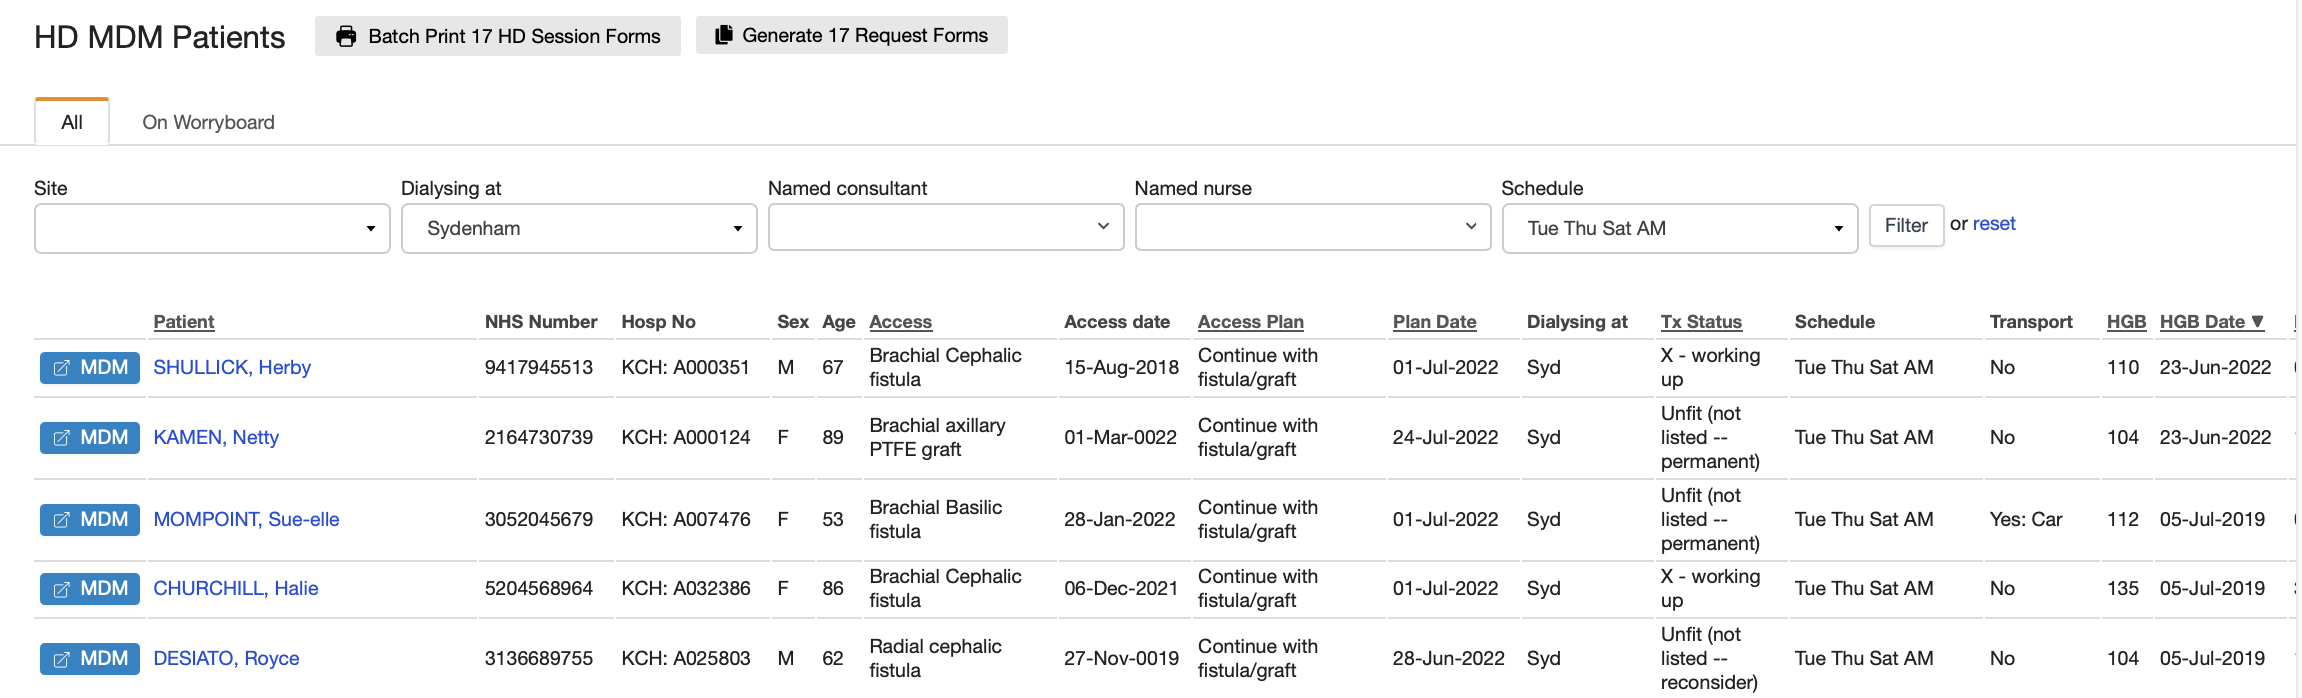
Finding HD patients
Individual HD patients can be found through the Search field using their Name(s) or any hospital number (local or NHS number). Groups of HD patients can be found through the HD MDM lists (MDM at top of each screen and scroll down to HD). Once in the MDM screen, this can be filtered to find the desired group of patients (e.g. by Hospital unit, HD schedule, Named nurse or Named consultant). The MDM list displays some useful data and each patient’s HD Summary screen can be accessed by clicking on their name.
Enabling an HD Profile
To enable the creation of the HD Profile, record HD sessions and other HD database functions, the patient has to have a Modality of HD. This is created via the Modality screen (available from the left gutter for each patient). Once a patient has an HD Modality, the HD screens can be accessed via the HD link in the left gutter. When clicked, this takes the user to the HD Summary screen for that patient.
HD Summary
The HD Summary screen displays the following:
- Current and previous HD Profiles
- HD Access Profile
- Virology
- Dry Weights
- HD Schedule and Preferences
- Latest HD Sessions
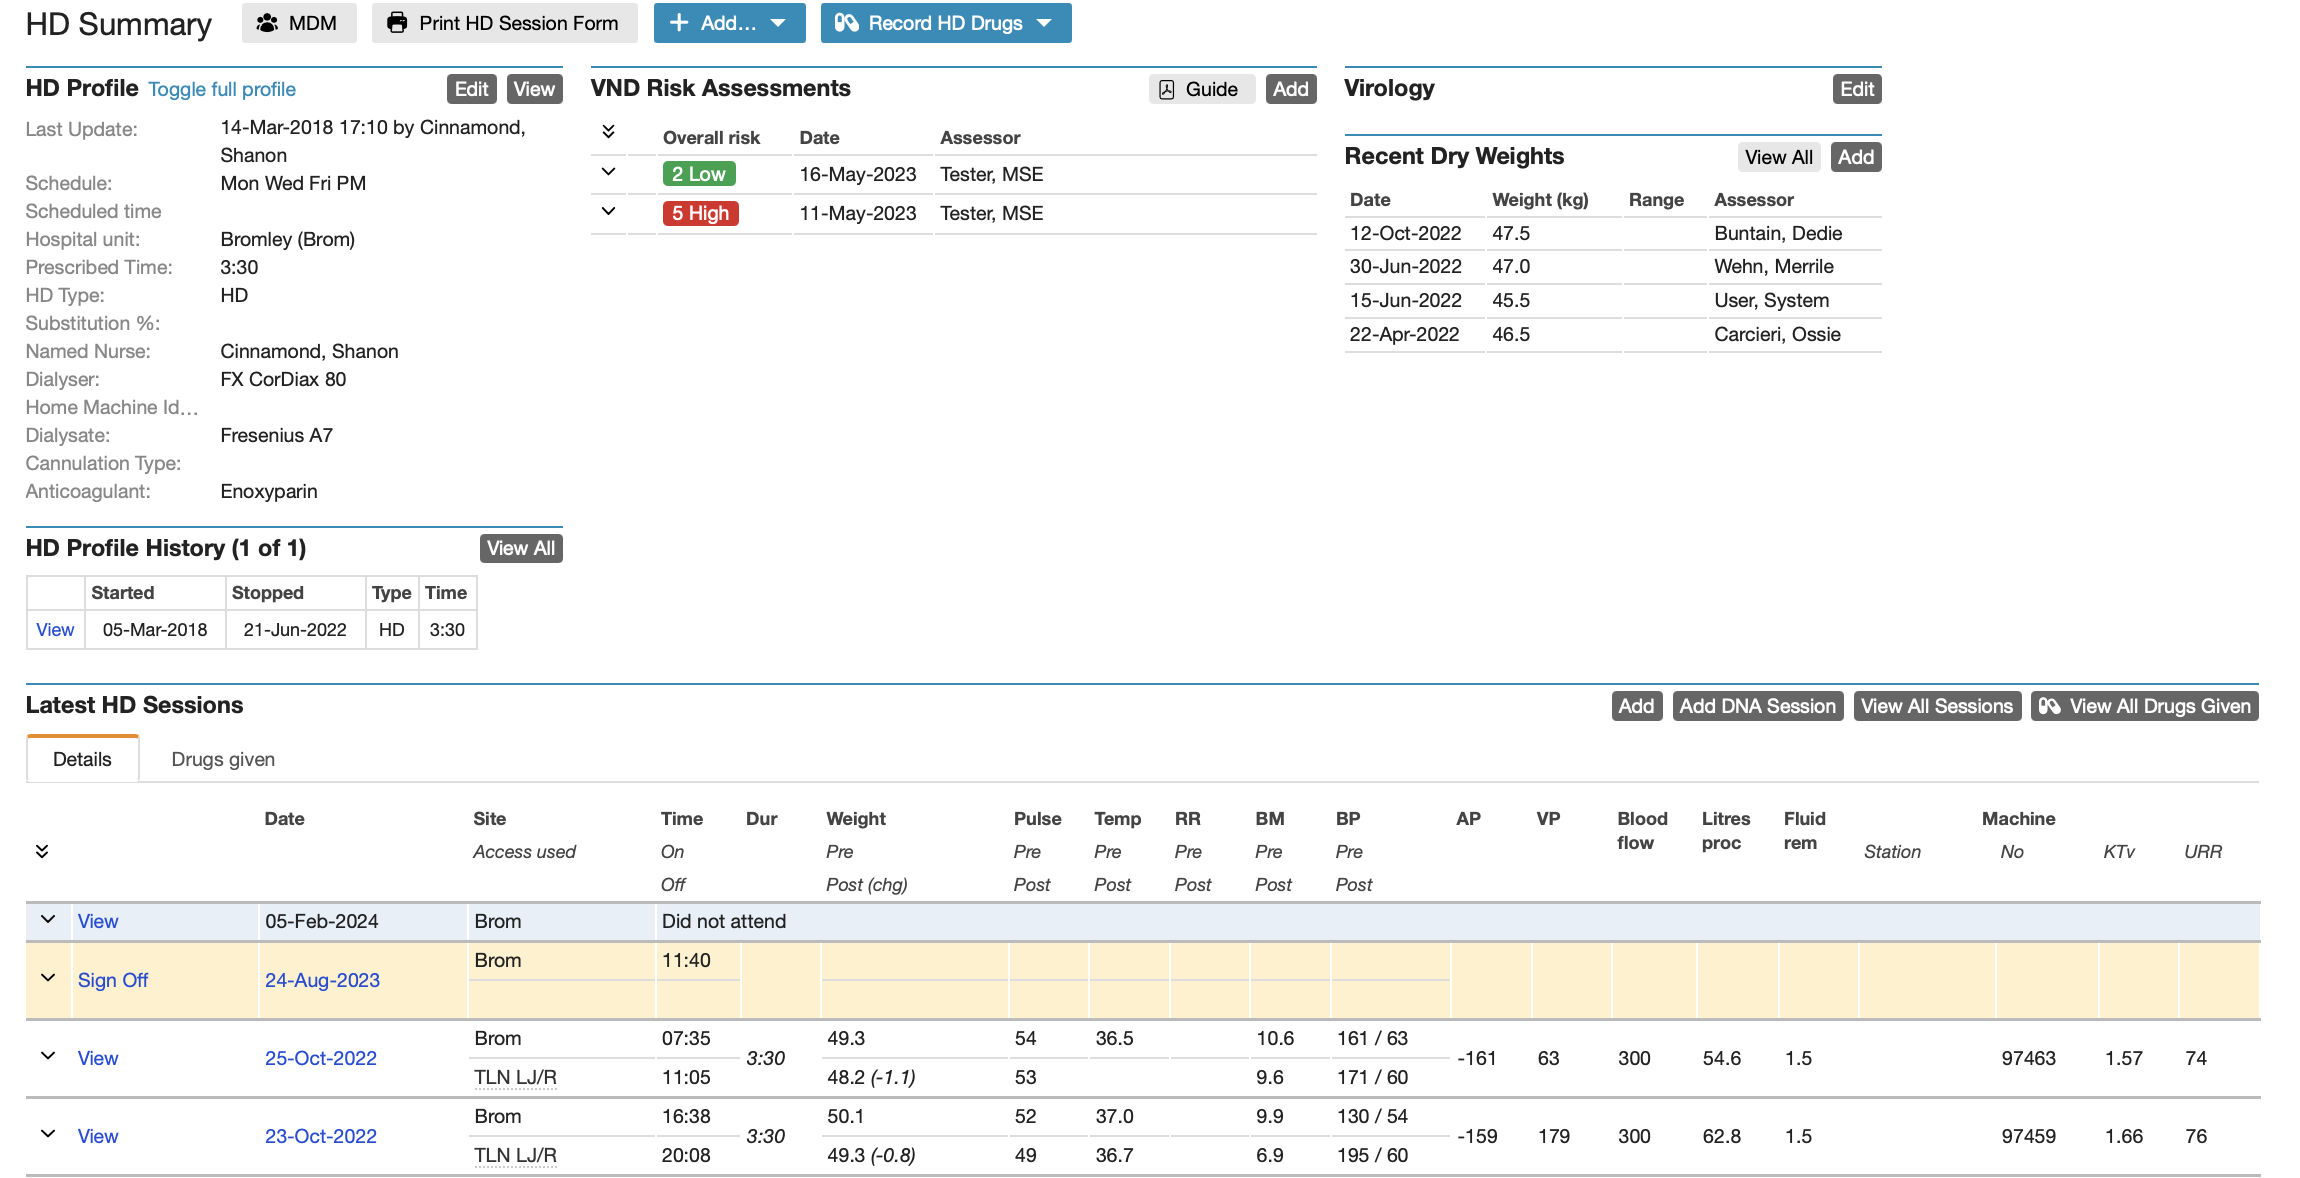
HD Profile
Use the Add button to create an HD Profile for a new patient. If the patient has an existing HD profile, this option will be unavailable and therefore use the Edit button to amend the existing HD profile where appropriate. This information is important to help define each HD session, pre-populate some fields for each HD session and help find groups of patients (e.g. having dialysis on M/W/F in the morning).
The HD Profile can be accessed from the left gutter (for patients with an HD modality) or from the HD MDMs list for patient review.
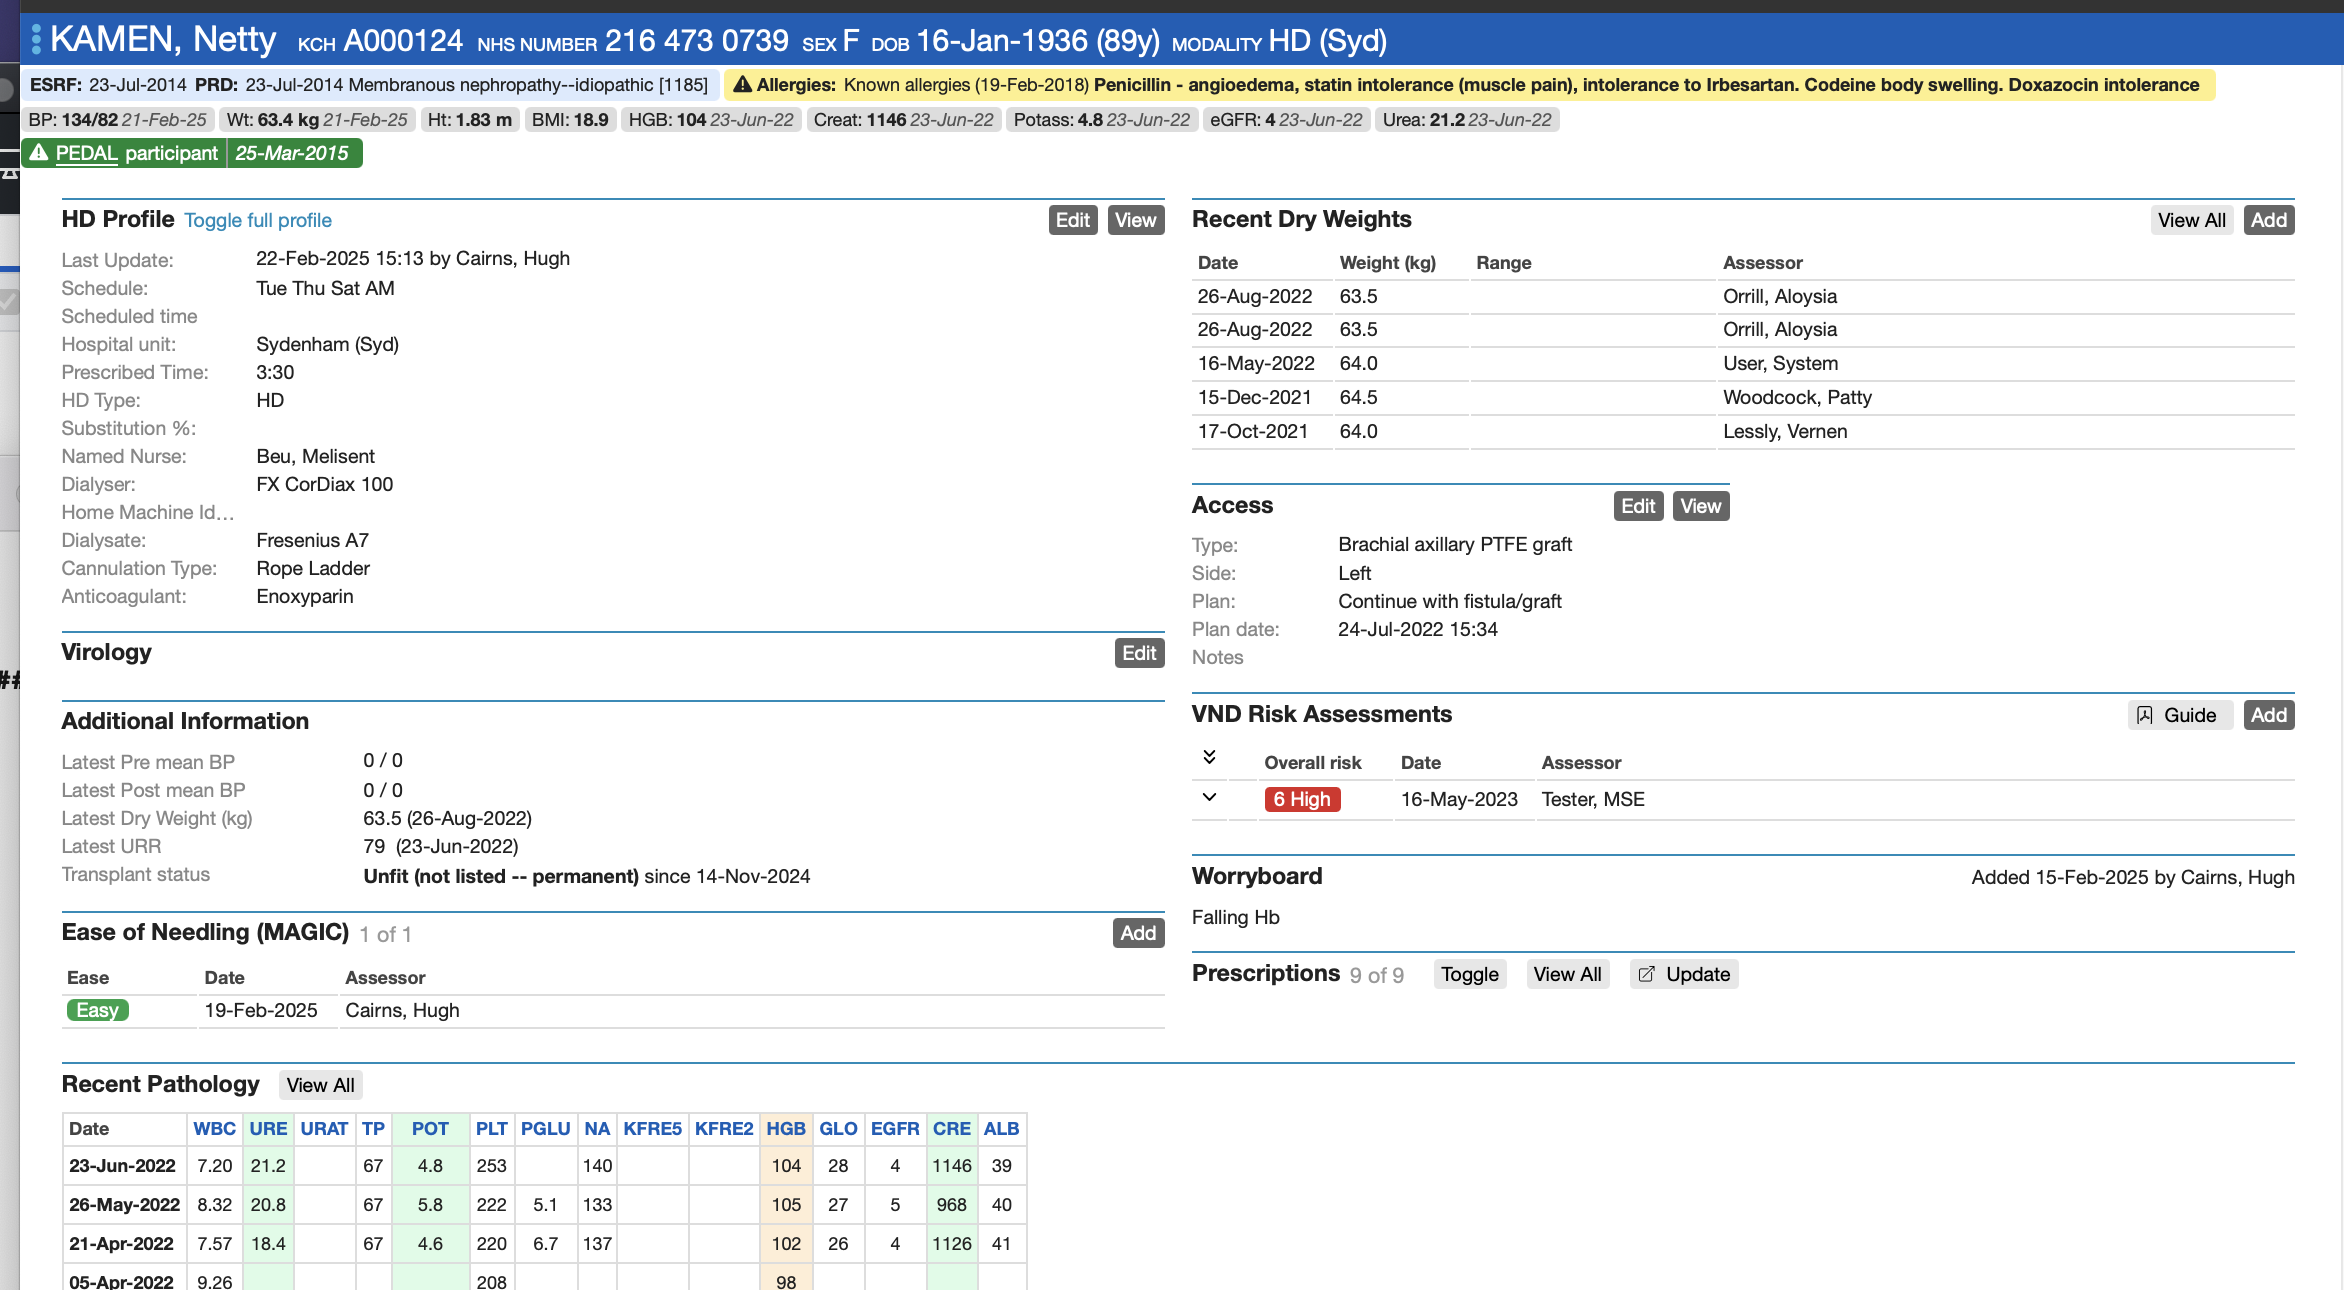
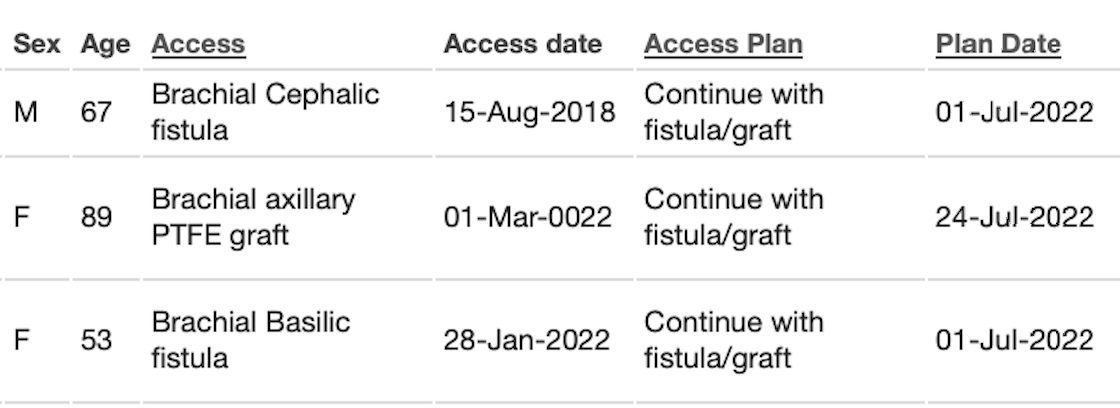
HD Access
These fields can be accessed using the Add or Edit buttons on the HD Summary screen or via the Access Summary link in the left gutter. Tracking access procedures and recording current HD access improves data quality and pre-populates the access fields for each recorded HD session. Recording the Access Plan for each patient enables staff to identify more easily patients who require access interventions or are awaiting a procedure.
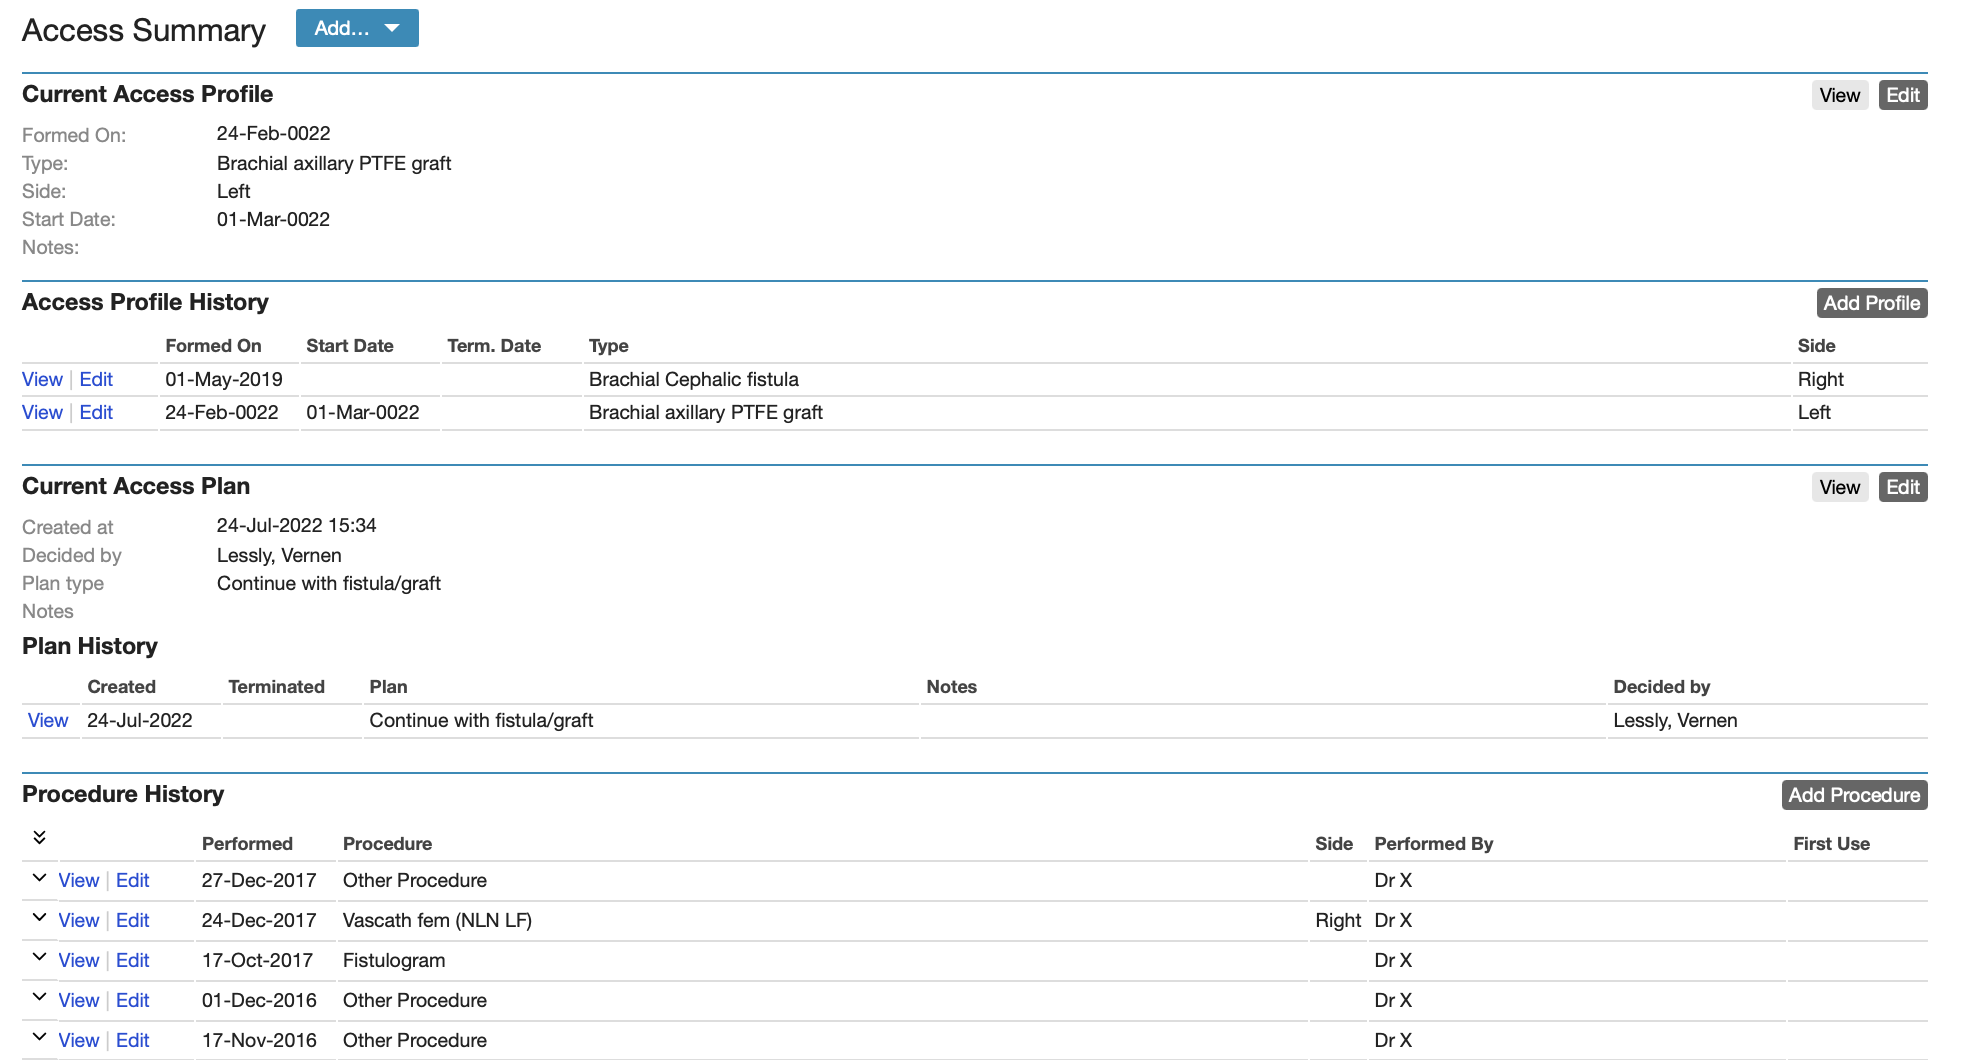
Note that the Access Plan information for each patient is displayed in the HD MDM listing for easy reference.
Entering HD Sessions
The new session screen allows entry for the following information:
- Sign In
- Sign Off – leave blank if session not completed
- Session Info
- Access
- AVF/AVG Assessment
- Pre Dialysis Observations
- Post Dialysis Observations
- Dialysis
- HDF
- Notes/Complications – the complications default to NO and the user can switch to YES for those complications which have occurred.
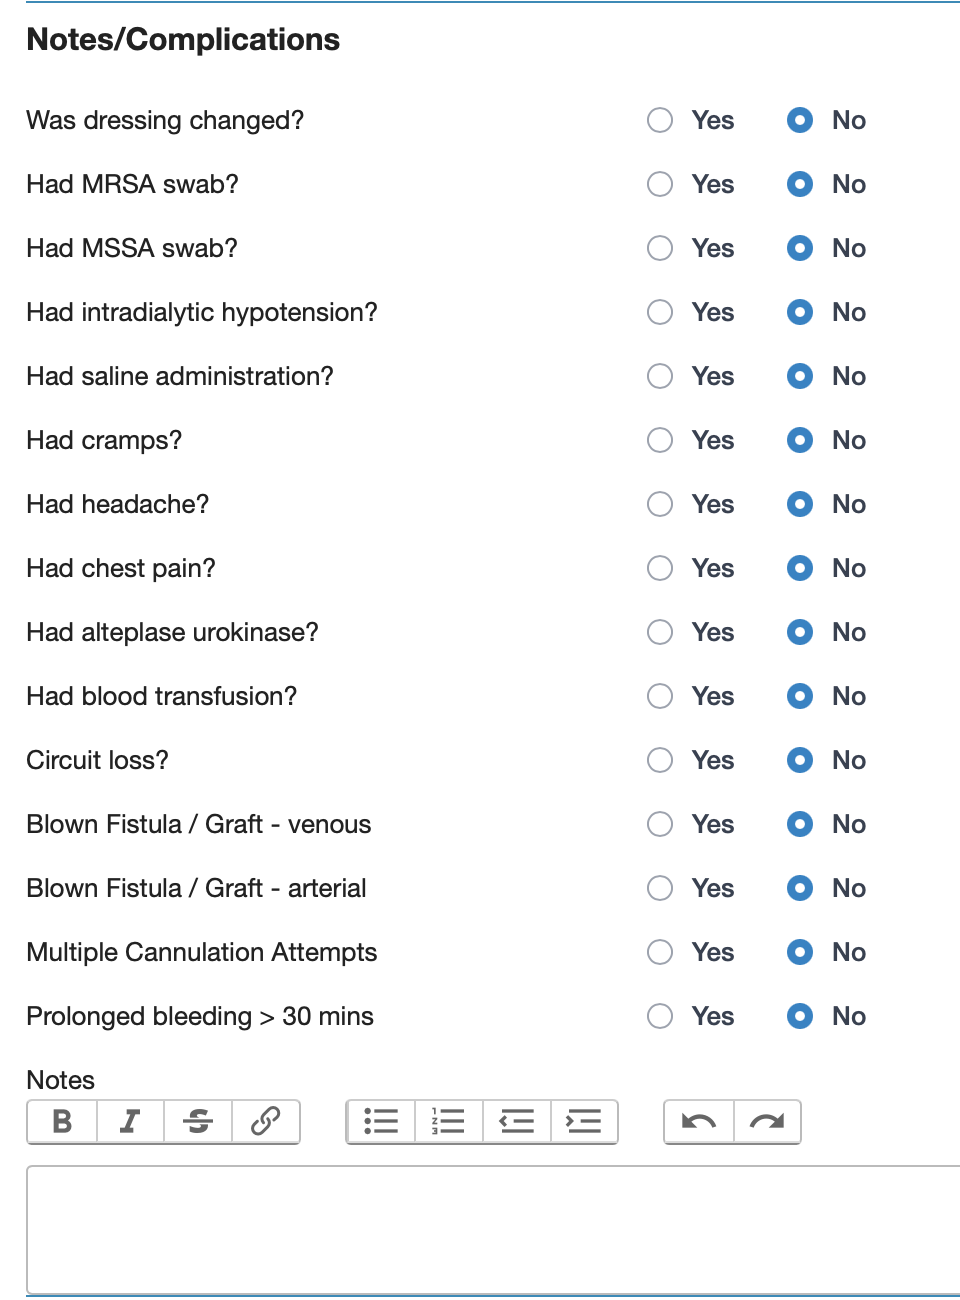
Accurate entry here is obviously essential for audits as well as for ensuring proper clinical care.
Some information will populate from profiles where appropriate. Verification of some default fields will be required when completing the session data (e.g. the user has to confirm that the current Access was used for this HD session). The “Save and Sign-off” button is available at top and bottom of the screen.
“Did Not Attend” an HD session is recorded by clicking on the DNA HD session button.
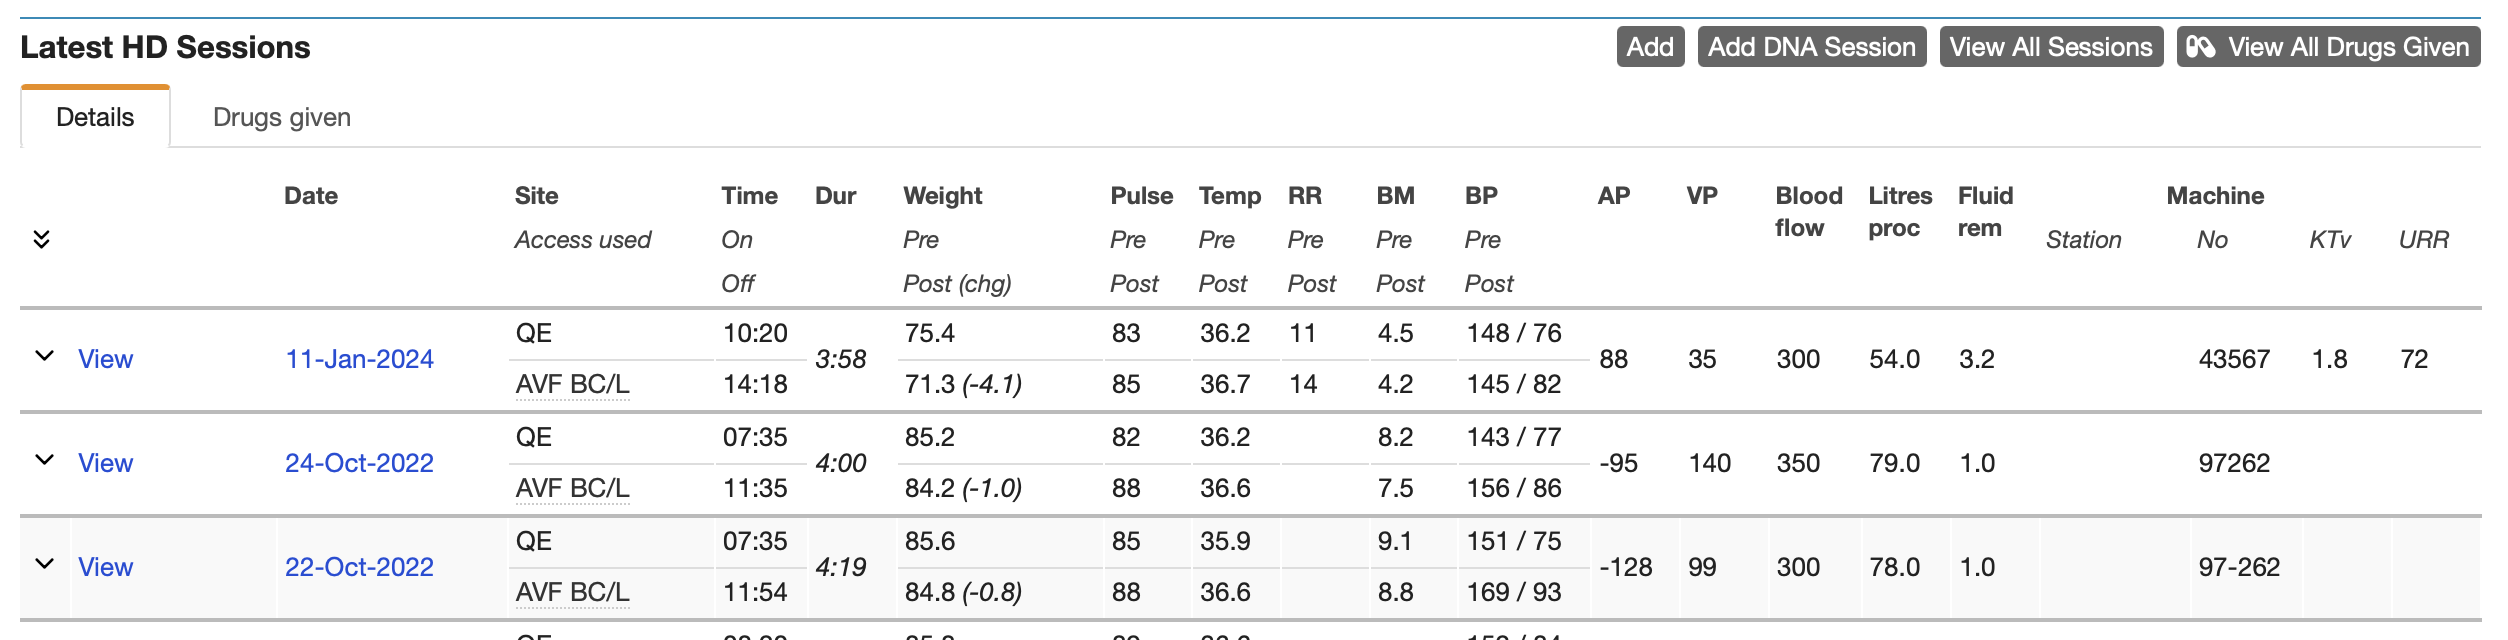
Latest HD Sessions
Recent sessions are displayed in the HD Sessions list:
One can toggle between displaying the session details (as above) and displaying any HD drugs administered during a given session:

Recording HD Administered Drugs
If a drug has been prescribed to be administered on HD, it can be recorded as given by selecting “Record HD drugs" and choosing the drug from the drop down (only medications which are recorded as “To be given on HD” will appear on this list). This option is available from the HD Summary screen. Drugs must be co-signed by the drug administrator and a co-signatory in order to be recorded as given at the end of the session. The sign-off process is performed by each user entering their password.
Transplant
Transplant Overview
Renalware handles all aspects of renal transplant care, including Transplant Workups, Recipient Operations, Follow-Ups, and Live Donor Workups. These are described below.
Locating Transplant Patients
You can look up Tx patients by selecting MDMs at the top of RenalWare and selecting Transplant from the black drop-down list. This will take you to a list of all Tx patients — you can filter by site, consultant etc. Select the patient and it will bring up their summary profile.
You can also use the Quick Search function to locate a given patient. Select “Recipient Summary“ under the Transplant section from the left gutter. This will take you to the Transplant Recipient Summary page.
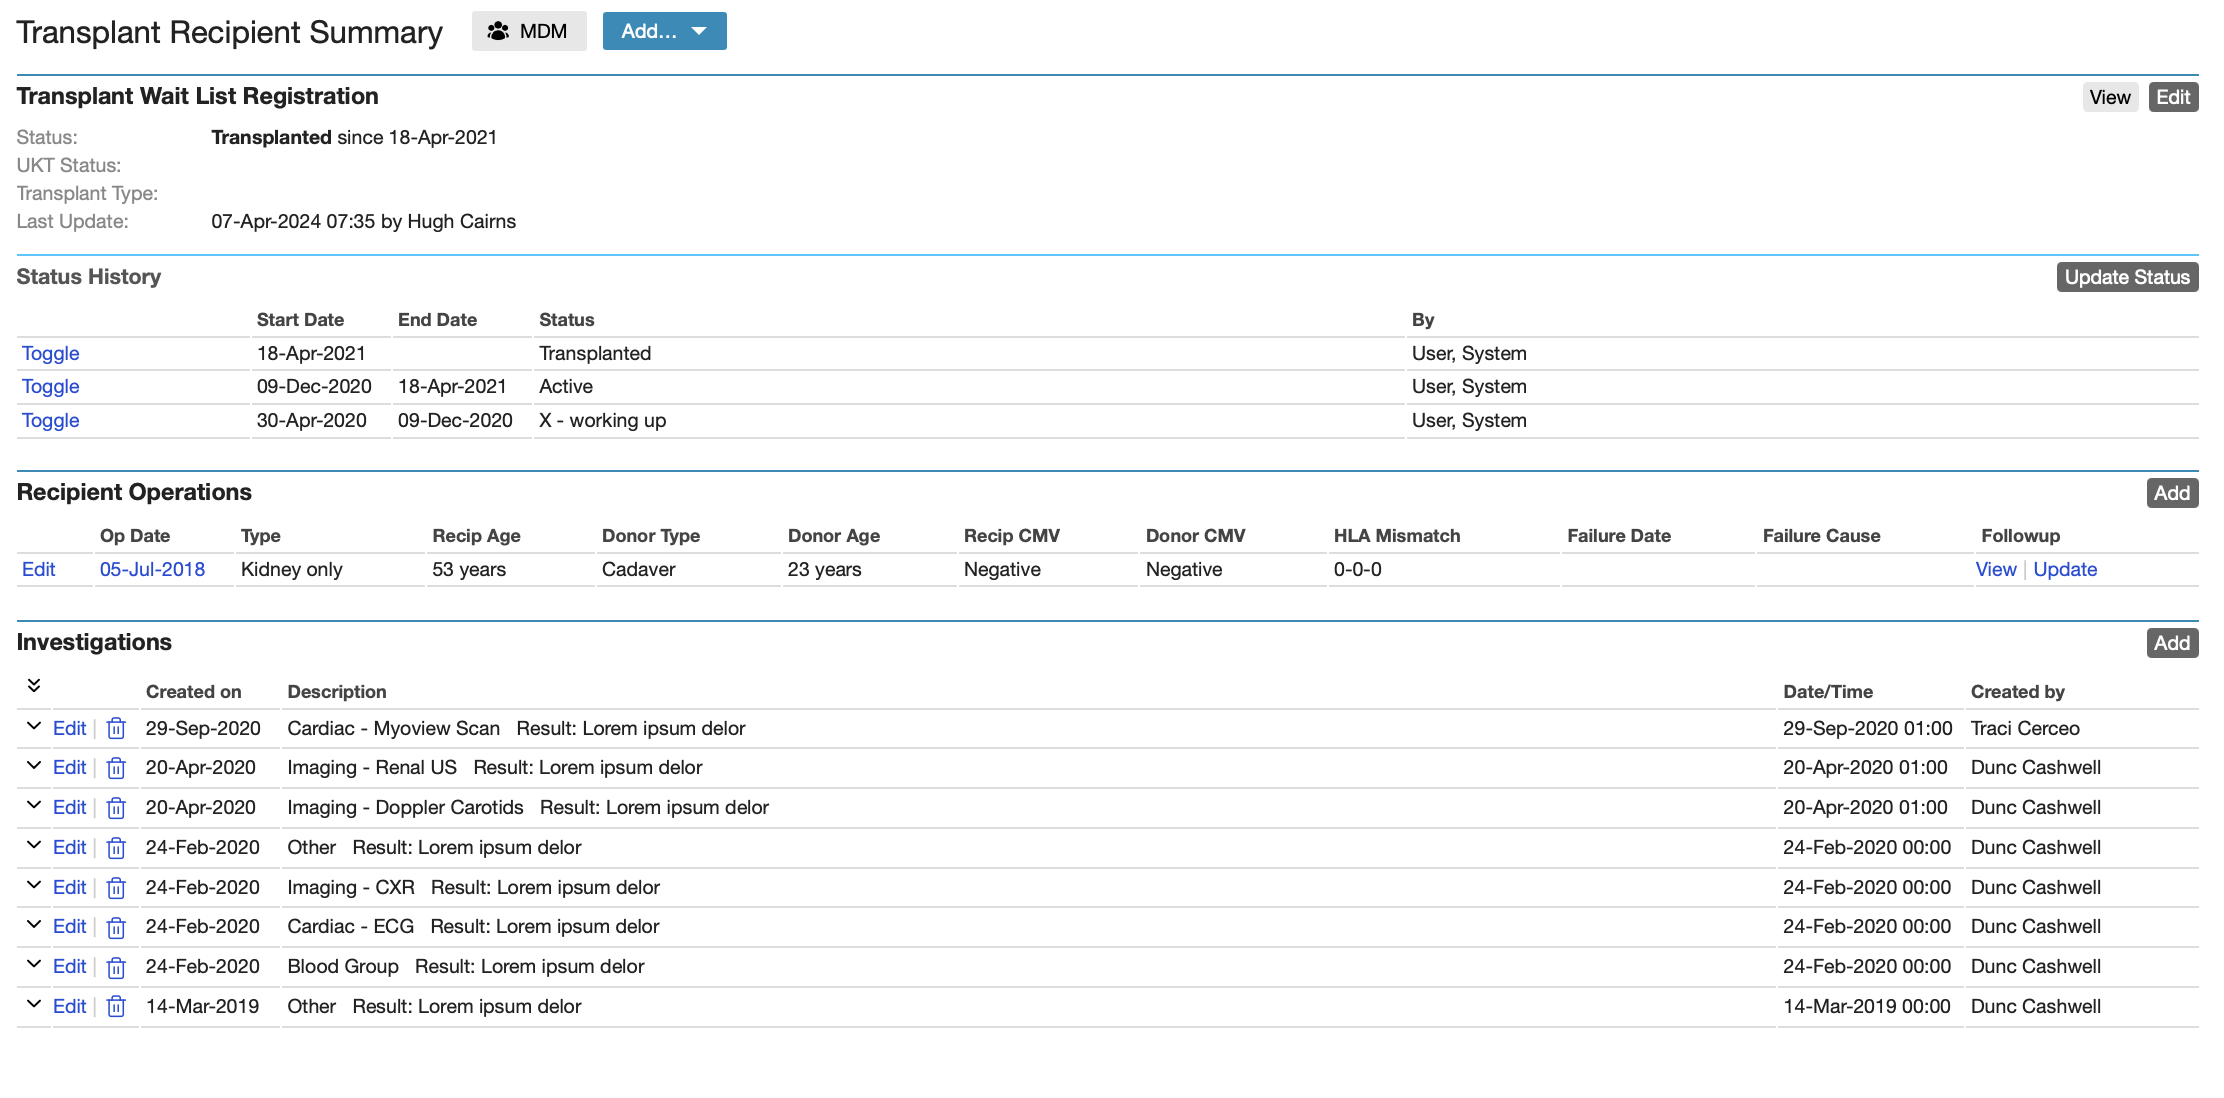
Transplant Recipient Summary Screen
On this screen you can see Tx status, wait list registration, Status history and Recipient operation details. Click on the blue ‘Add’ tab and you can select ‘recipient work up, wait list registration, recipient operation and add investigation’ to update each section with required information.
Recipient’s Workup
Recipient’s Workup – selecting this option from the Summary will then take you to the work up page – fill in as much of this page as possible and click on the blue ‘create’ tab at the bottom of the page. Select the Transplant Recipient Summary to go back to the main summary page.
Recipient Operation
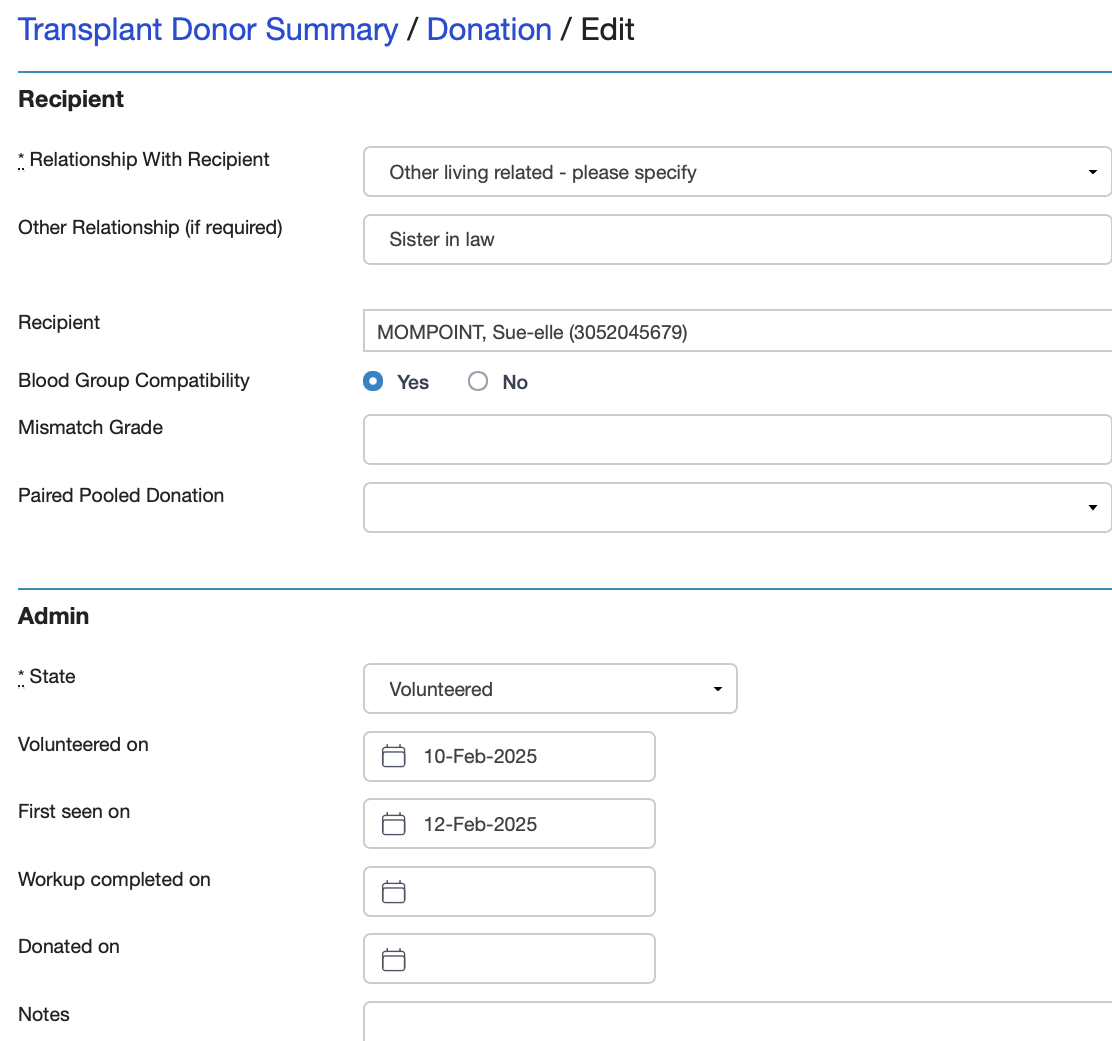
This option is available from the drop down menu. Complete as much of this page as possible (required fields are Op Date, Op Type, Op Site (hospital), Operation Number (i.e. is this the 1st, 2nd or 3rd Tx) Donor type, If live then relationship. If cadaveric go to cadaveric part and enter cadaveric type), Date of operation and click on the blue ‘create’ tab when done. Select the transplant Recipient Summary to go back to the main summary page.
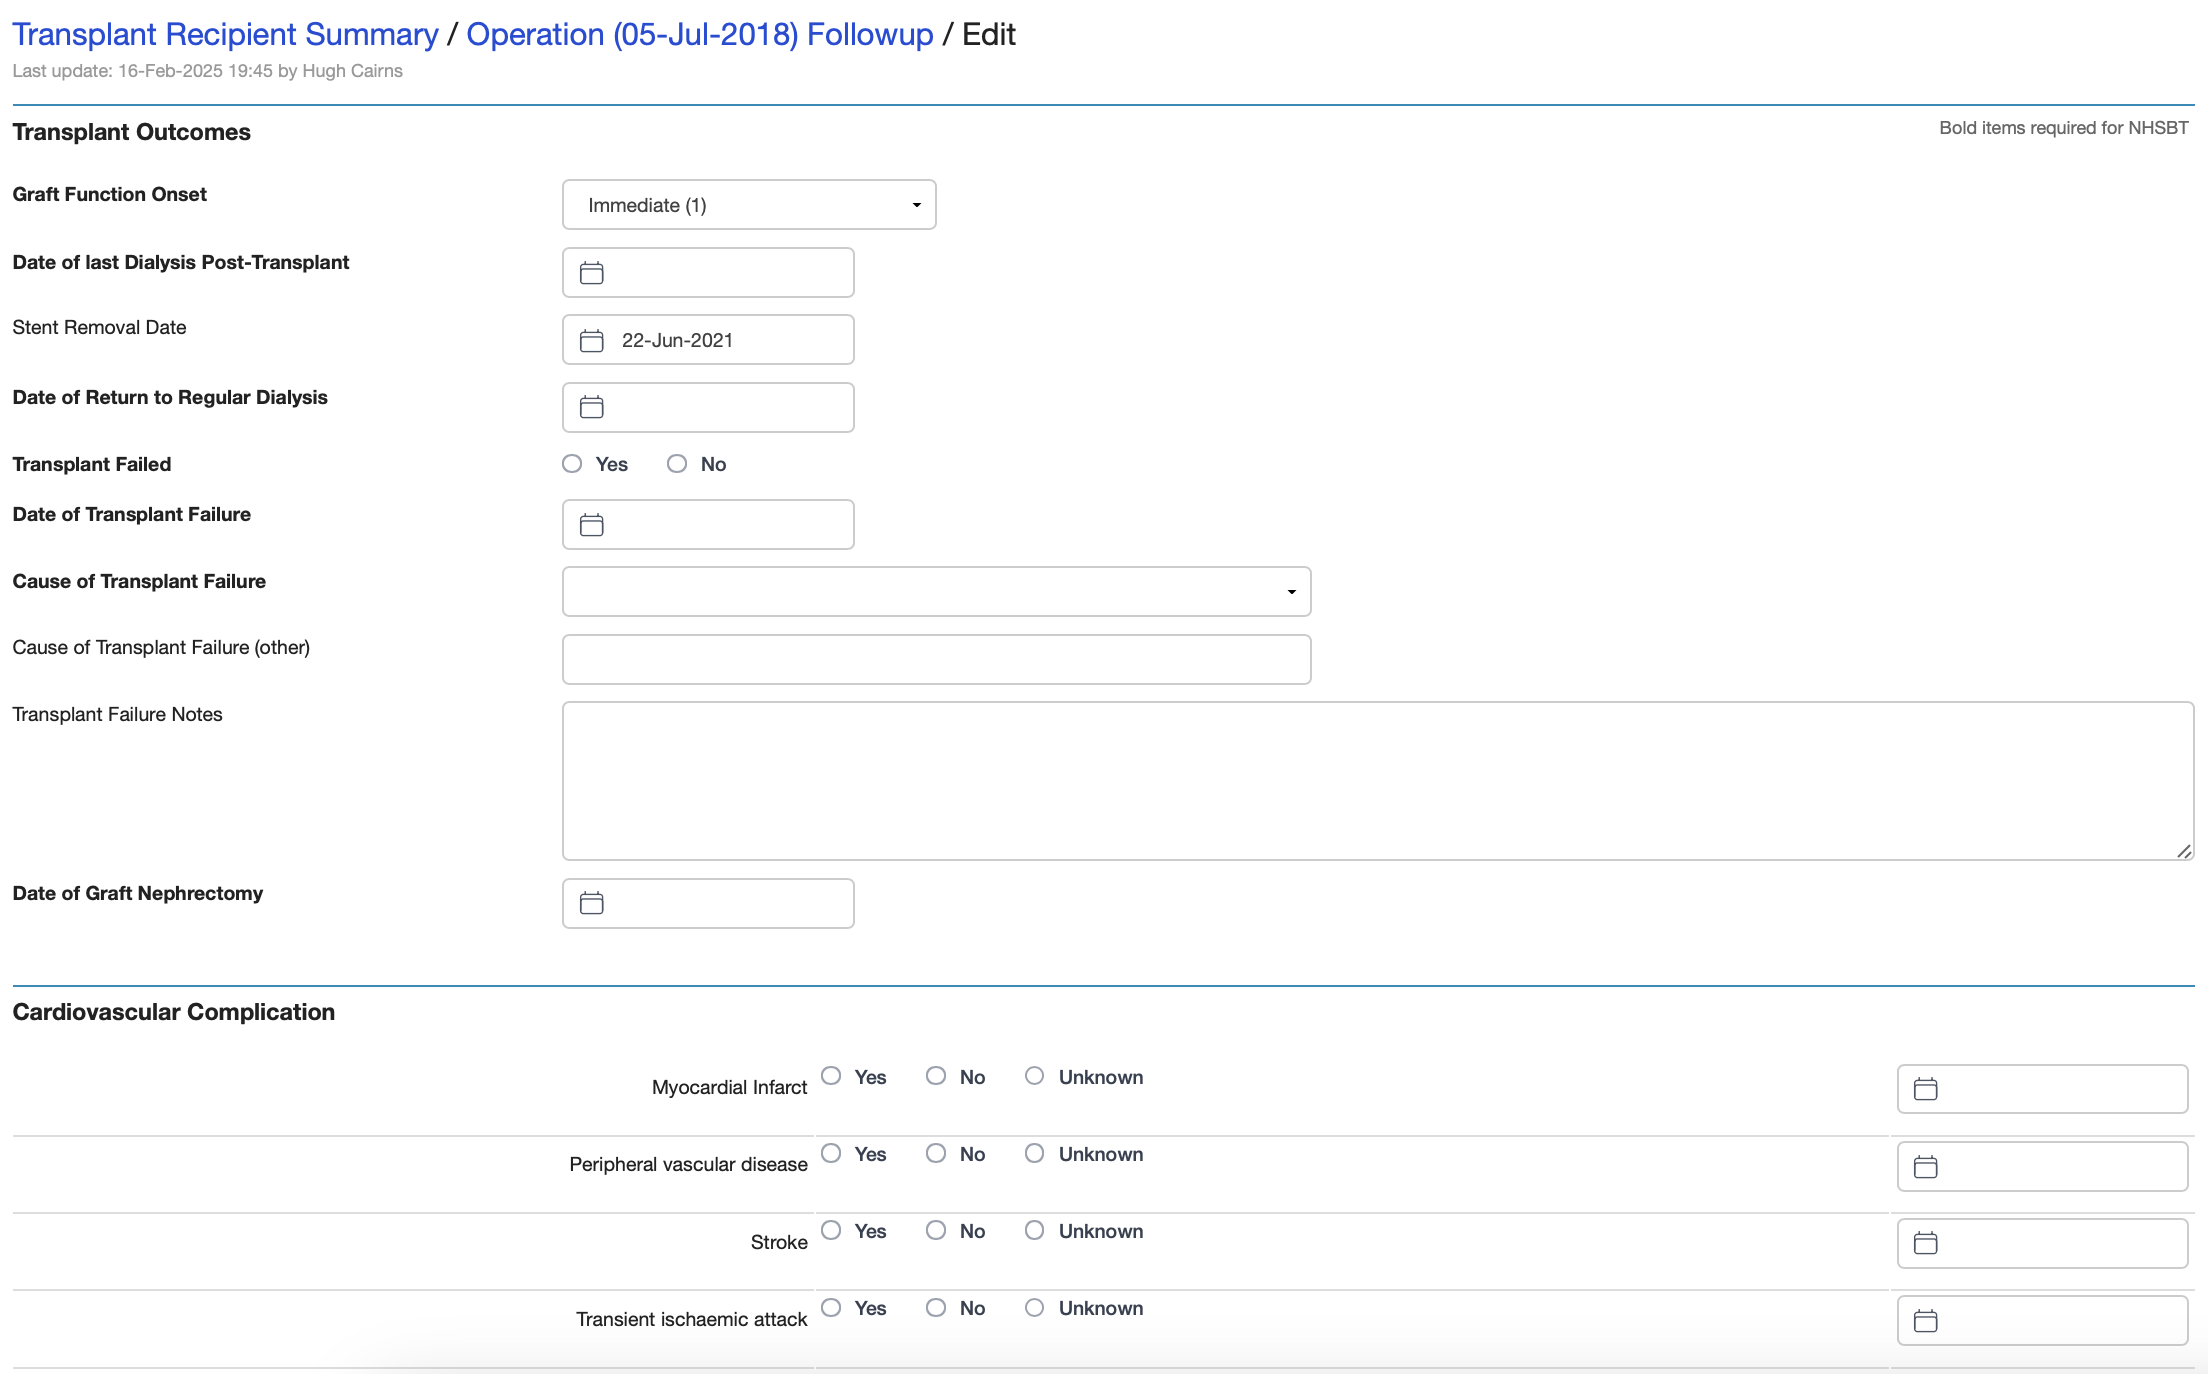
Follow-Up
On the main summary page under the recipient operations section at the bottom, there is a follow up heading – under in blue writing there is a tab ‘Enter Details’. Select this option. It will take you to the follow up page, complete as much of this section as possible (what would be on the follow up paper version), also under the ‘Transplant Rejection’ heading, click add to add each episode of rejection in. When done click on the blue ‘create’ tab when done. It is important that the follow up section is kept updated as and when new follow up details occur. (This section will be replacing the paper versions of the follow up document we currently complete and send to the renal registry.) If a patient has a rejected transplant you will need to add each rejection in as separate episodes.
Live Donor Workup
Potential Live Kidney Donors can be tracked through Renalware and data recorded related to the workup process and the donor operation. This depends on creating a Live Donor modality for the patient: once this is done, Donor Summary will appear as an option in the Left Gutter and work up and other data can be entered.
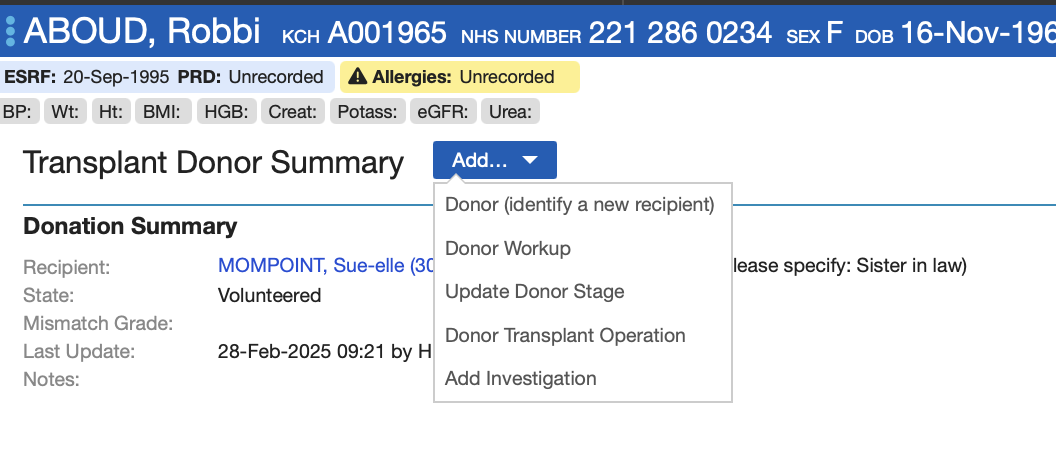
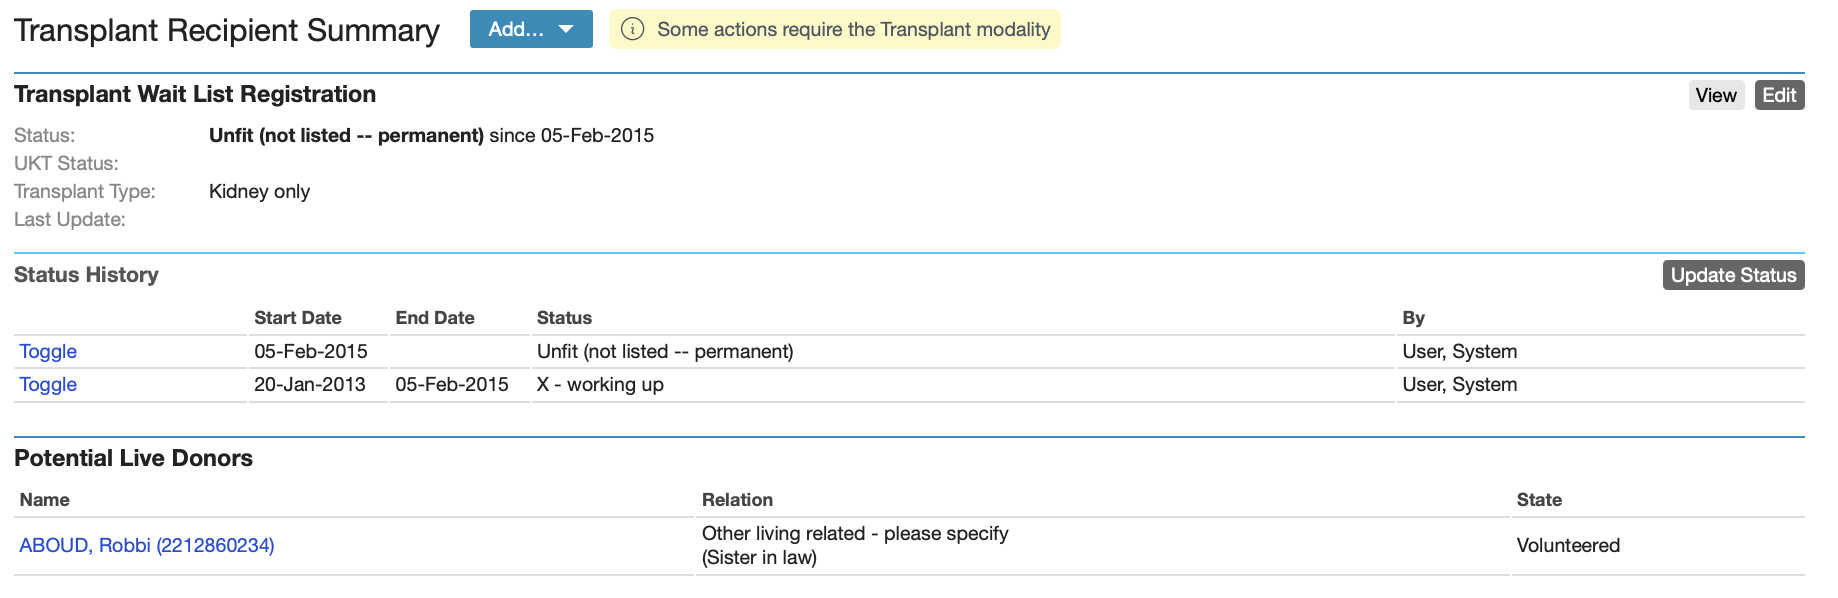
As seen below, the potential recipient for the live donor can be selected from the list of patients in Renalware and entered into the Recipient details section:
Once selected, the Recipient will appear on the Summary screen for easy access of that patient’s records. Equally, once the potential recipient for a Live Donor is selected, the Live Donor will appear on the Recipient Summary providing a link back to the potential donor(s).
Peritoneal Dialysis (PD)
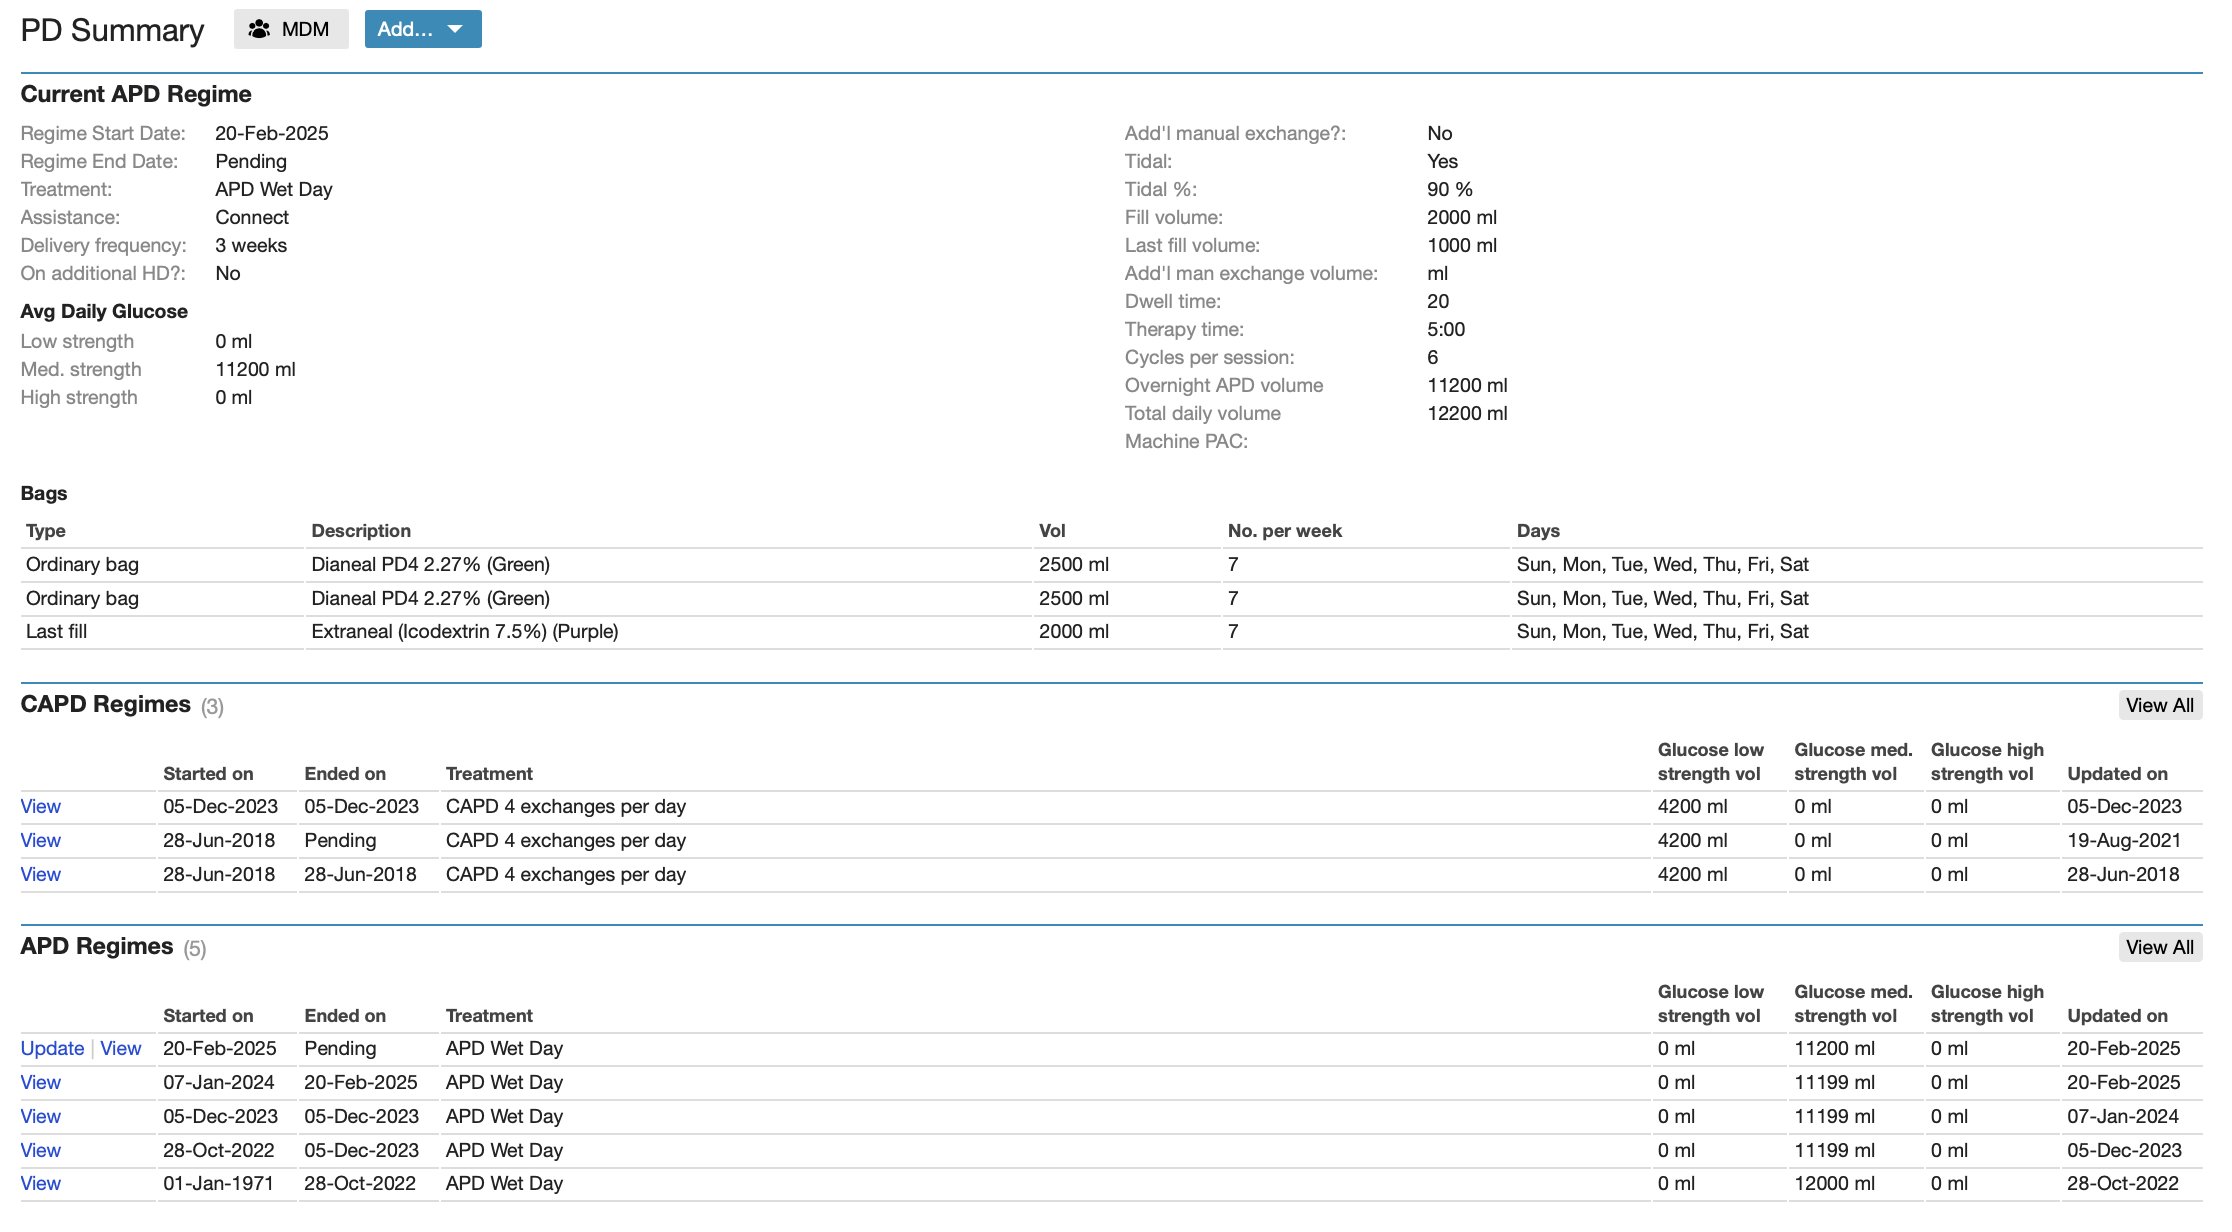
The PD screens are accessed through the Left Gutter. Many of the screens for PD can only be created if the patient has a Modality of PD. The main PD Summary screen displays the patient’s current regime and any historical APD/CAPD regimes.
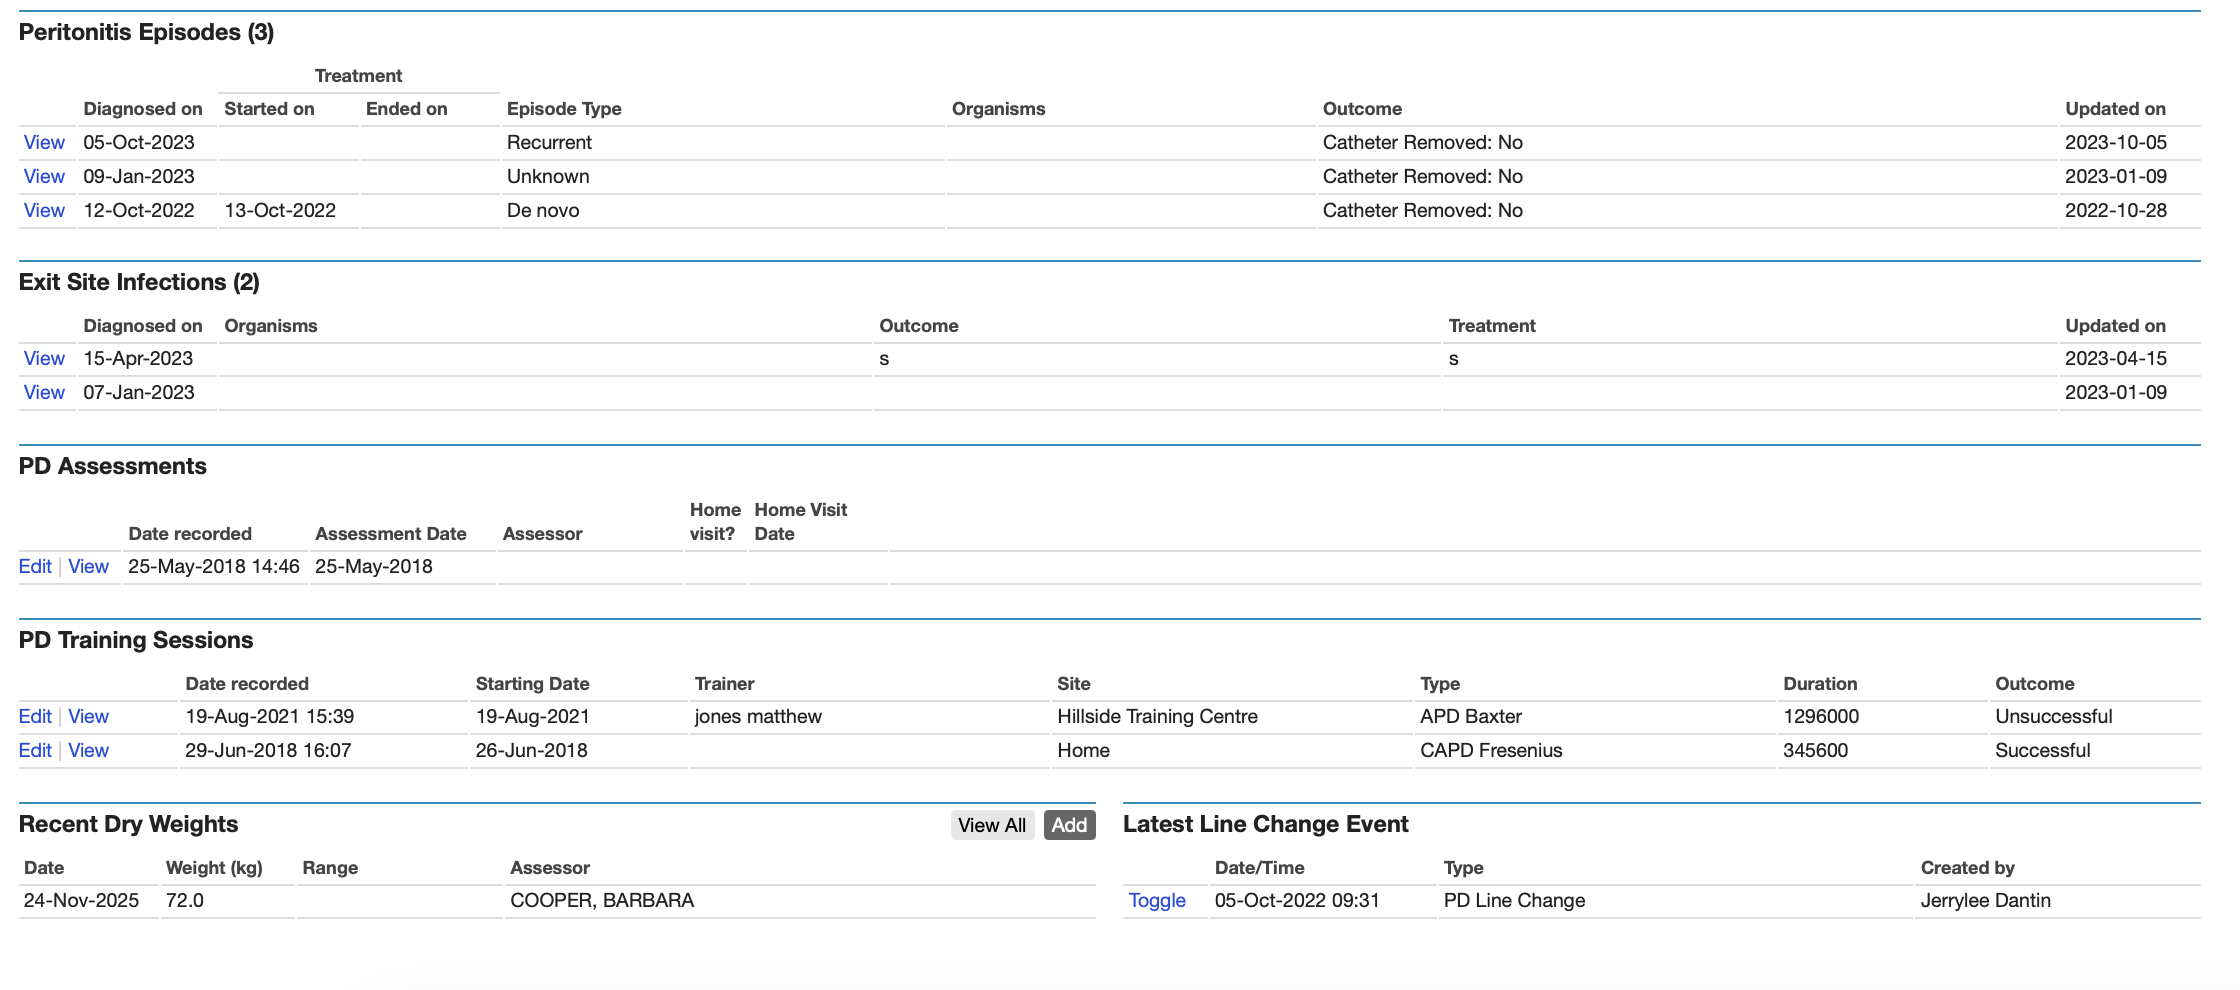
The PD Summary also includes information about any Peritonitis Episodes, Exit Site Infections, Assessments, Training Sessions, and Dry Weights:
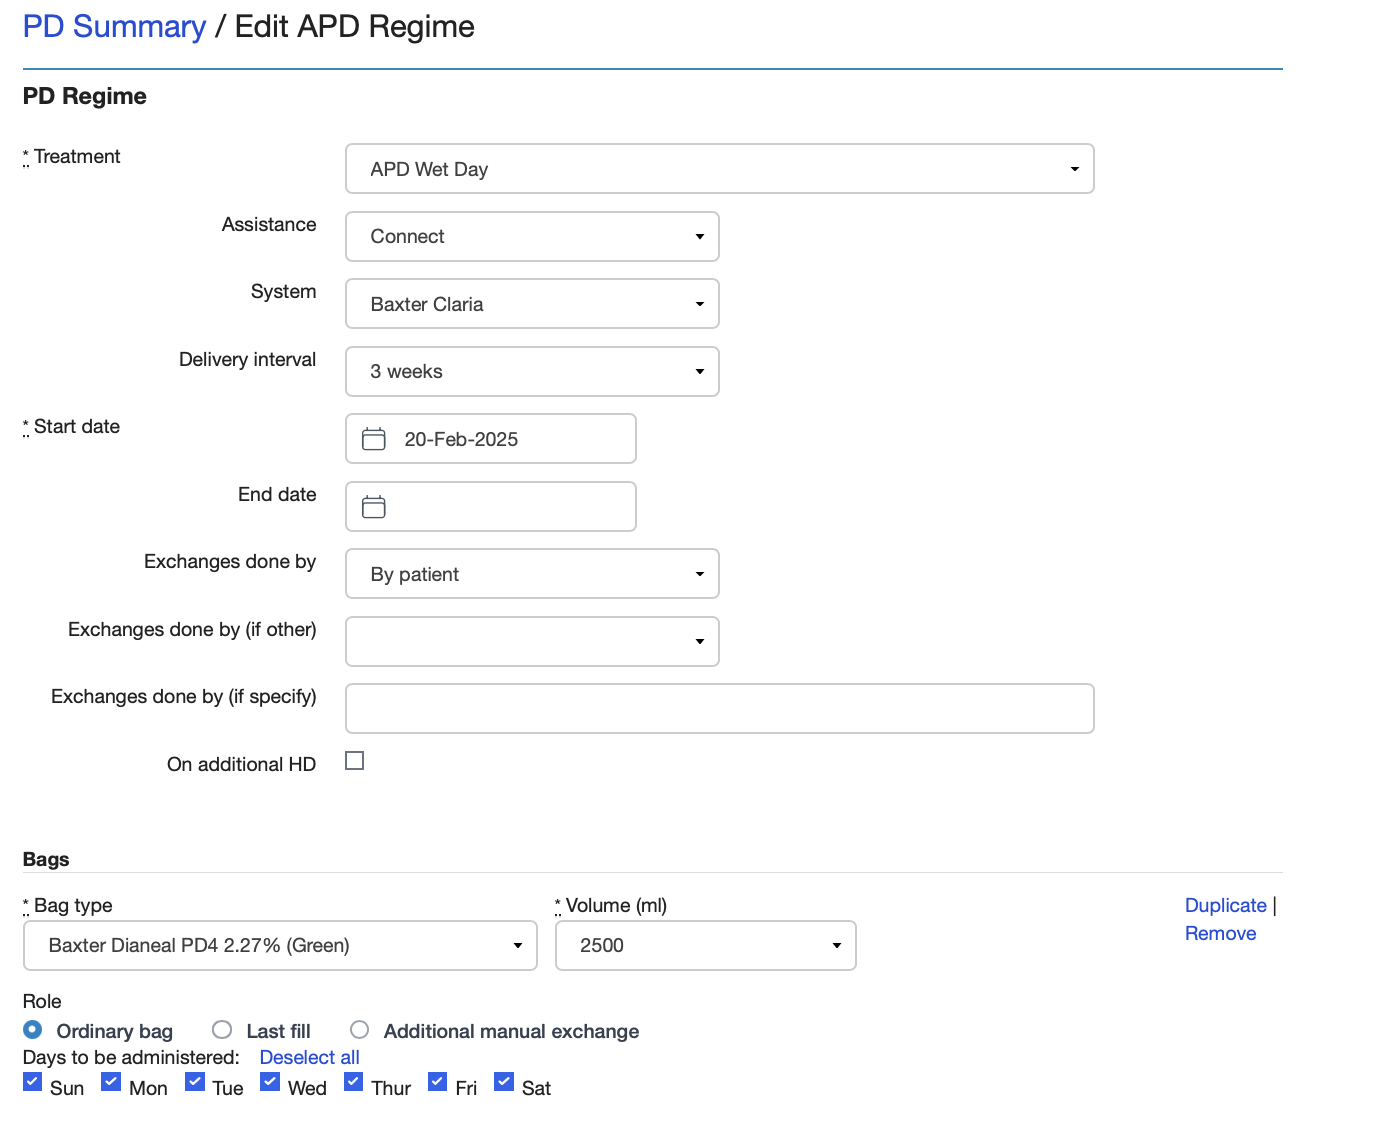
PD Regime data
For patients starting PD, the PD regime type must be selected (CAPD or APD) and then the data entered for the particular PD regime. As you can see, this covers the type of PD (e.g. APD Wet Day, APD Wet Day Assisted, CAPD with number of exchanges and whether Assisted or not) and then the details about the PD fluid used, the volumes, tidal or not, last fill, additional manual exchanges and whether has additional HD. The Start Date for each PD regime will also be the End Date for any previous PD regime if the patient has one. For the Last Fill for an APD regime it is important that the bag is entered as a “Last Fill” so the system knows which fluid is being used as the Last Fill.
Once a patient has an APD or CAPD regime, this can be changed and the current regime is available as a baseline so many adjustments to a PD regime may be very easy to enter. For example, if a CAPD patient is being changed from 4 bags to 5 bags per day with just an additional bag, only the additional bag needs to be entered.
PD Peritonitis and Exit Site Infections
PD peritonitis data and exit site infection data can be entered and then subsequently edited as new information becomes available. It is important that the type of PD peritonitis (e.g. De Novo, Recurrent, Relapsing) be recorded as this is used for audit and also the Quarterly Quality Indicators return.
PD Assessment and PD Training
Prior to starting PD, information about the suitability of a patient for PD can be recorded using the PD Assessment screen. Information about PD training can also be recorded using the PD Training screen.
PET and Adequacy
Biochemistry results for the PET and Adequacy tests can be entered and the PET and Adequacy values are then calculated.
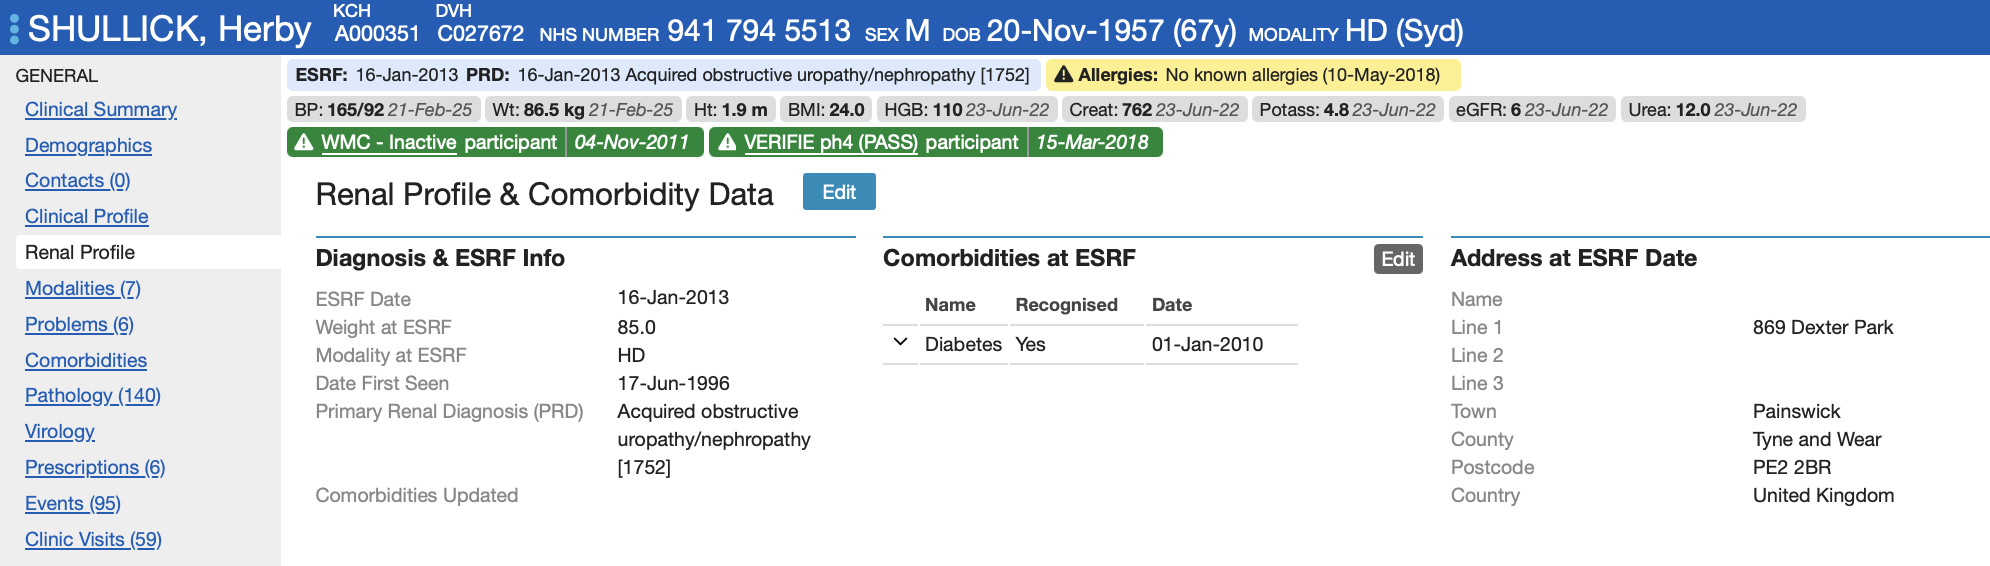
Access Summary
Information about patients’ access for dialysis are recorded and displayed through the Access Summary screen (left gutter). This covers Access Procedures (so both for HD and PD), Access Profile, Access Plan, Access Assessments, Ease of Needling of Vascular Access (MAGIC) and Risk of Venous Needle Dislodgement (VND). Data can be entered via the Add button at the top or by Edit / Add in each section.
Many of these fields are also displayed on relevant other screens elsewhere. For example Access Profile, Access Plan, MAGIC and Risk VND shown on HD screens.
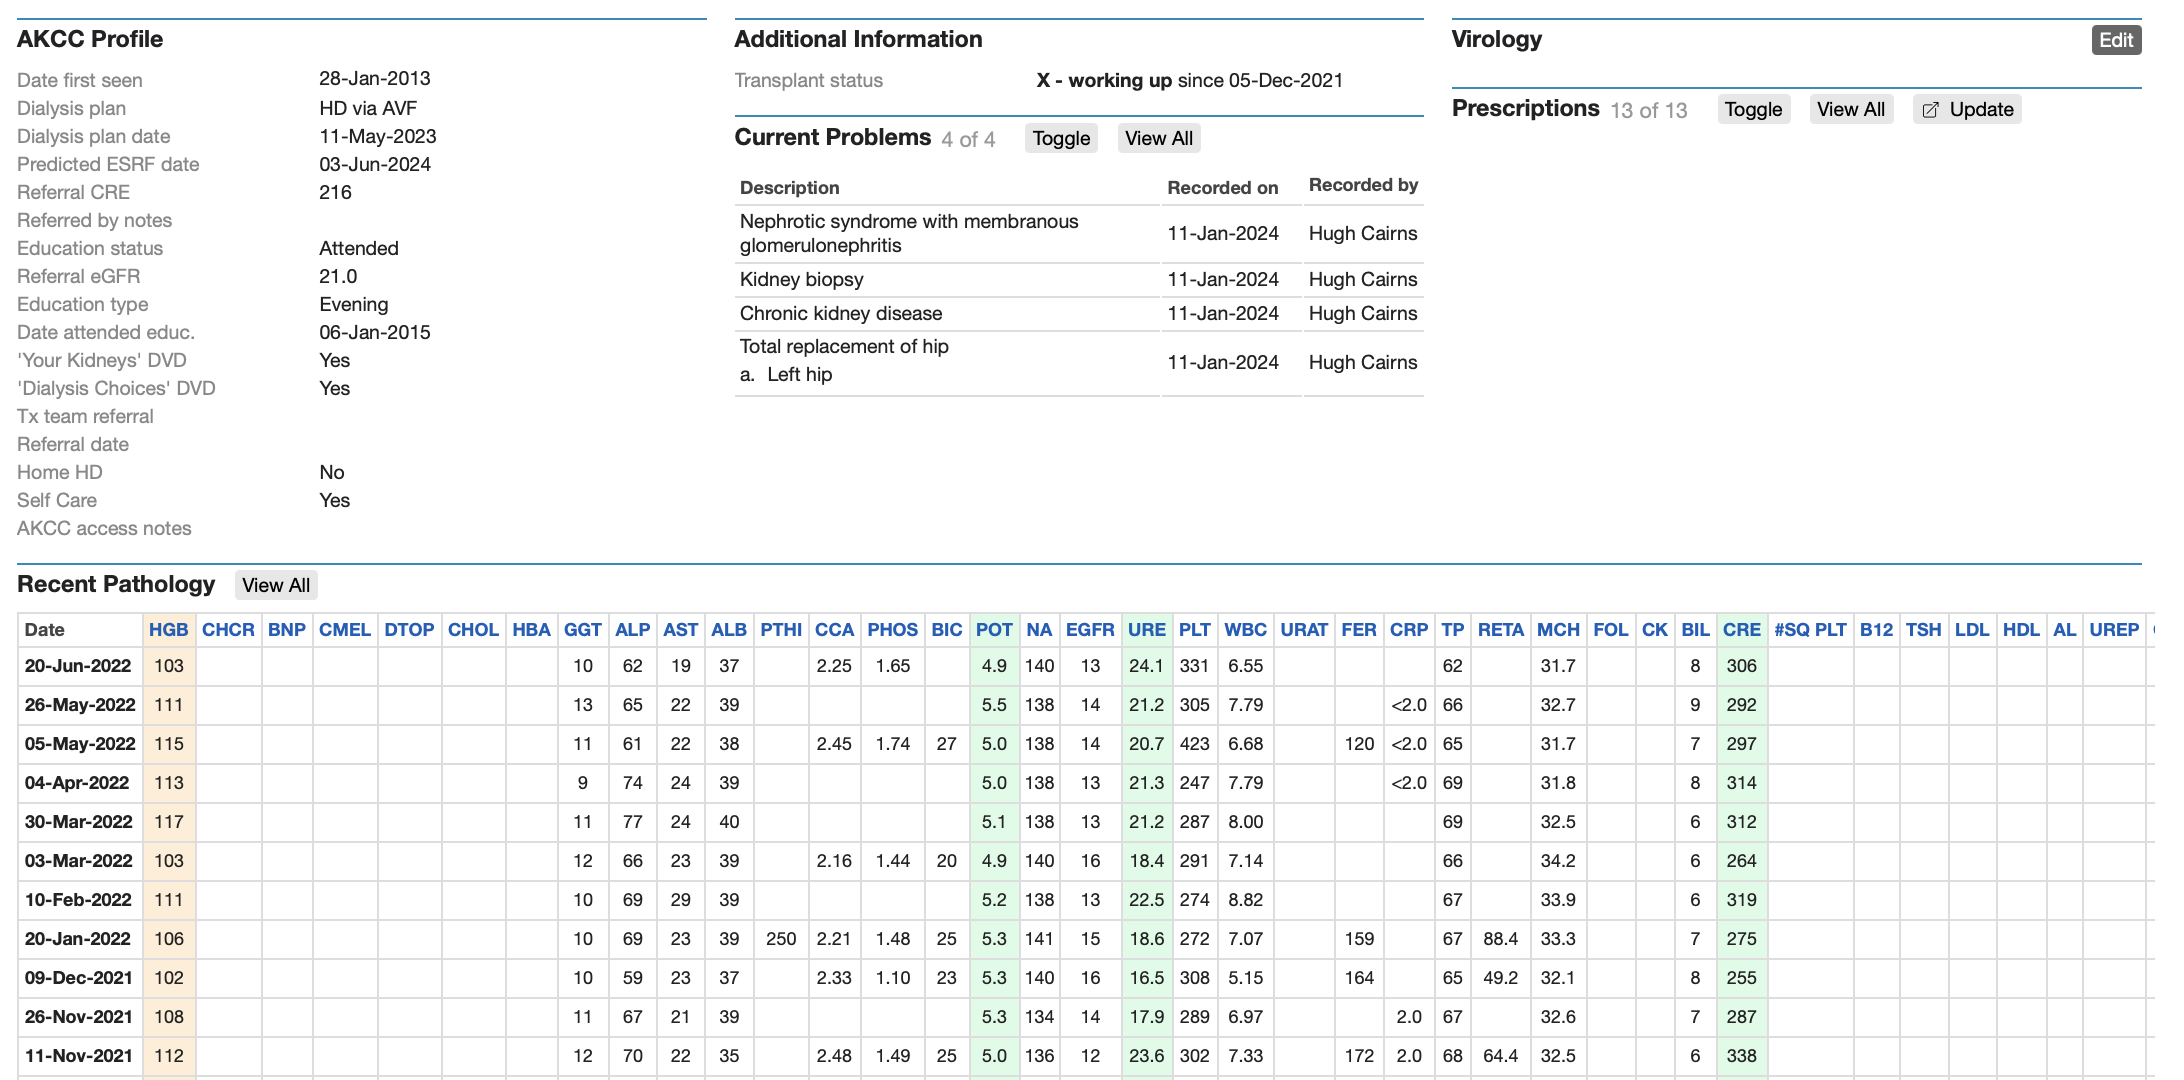
Advanced Kidney Care Clinic (AKCC)
The AKCC information is entered via the link in the left gutter. The basic information includes Date First Seen in AKCC, Dialysis/RRT Plan and the Date of the Plan, Predicted ESRF Date, Referral Creatinine and then various bits of information about patient education. Some of the information may not be known when first seen and therefore fields may be left blank and completed subsequently.
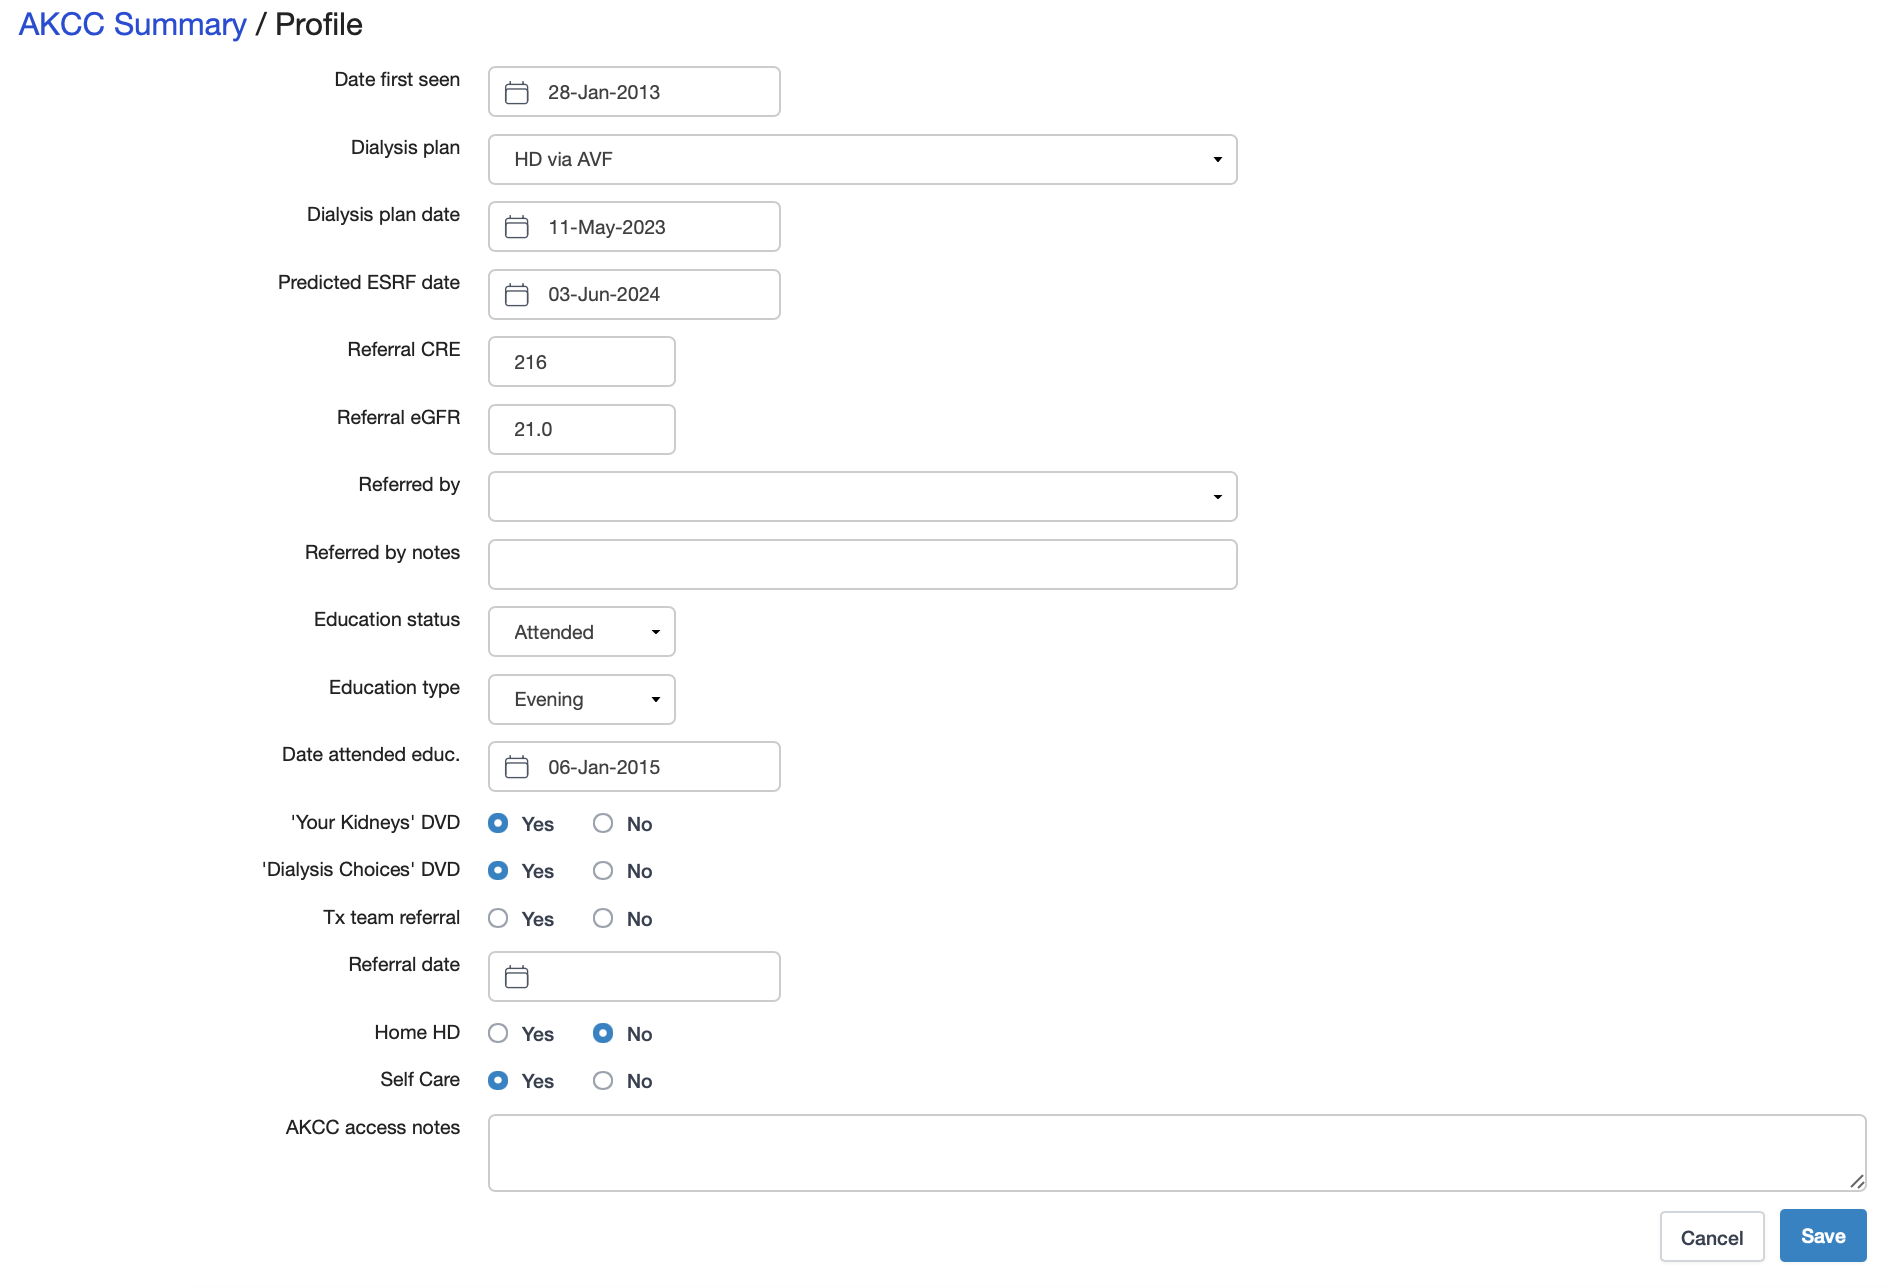
Additional information useful for the management of AKCC patients can also be seen and entered on this screen (Clinical Frailty Score and Advanced Care Plan). This information can also be entered and seen on the Clinical Profile (left gutter).
If the AKCC data is changed or updated, the new information will be displayed. Data related to AKCC can be seen on the AKCC MDM screen for each patient and groups of patients found via the AKCC MDM listing from the top banner. Once within the MDM patient list, this can be filtered to find different groups of patients (e.g. based on blood results, whether for Supportive Care, by site, Named Consultant and Named Nurse).
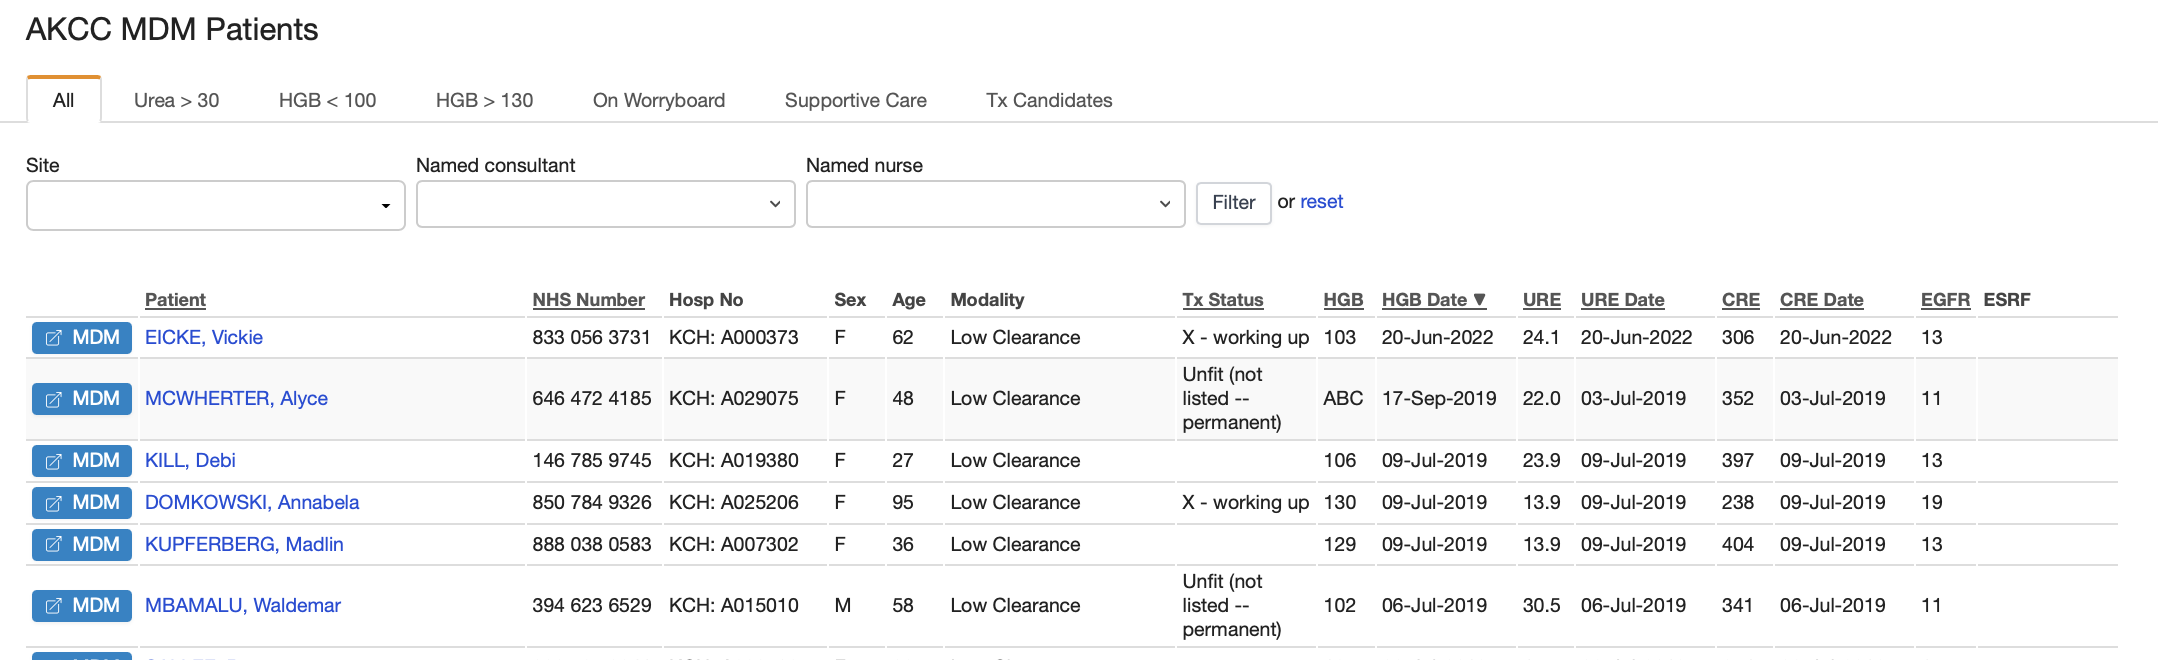
The “MDM” link on the list takes the user to the complete AKCC Profile and other relevant information: